
Take a Photo Trip!
Want a sure fire way to take better landscape photographs? Plan a photo trip. Every photo trip I have ever done has resulted in some of my top photos of the year.
Why a Photo Trip?
The reason I get such great photos on photo trips is focus, and I don't mean camera focus, mental focus. Because I am there to take photographs and nothing else I immerse myself into the task. I get up before sunrise and finish up after sunset; I take my time at the location trying different compositions and angles; I experiment with long exposures, panoramas, and HDR. I plan!
Planning
This is probably one of the more important aspects of a photo trip. Before the trip I will map out my destinations, look at tide tables, and sunrise/sunset times. But even when my plans go awry I still get good shots, because I have time, I have a purpose, and I have a single task. Take photos.
Dedicated Time
This is why photo trips are so successful. You have time to take photos, you aren't rushed. When I am travelling with my family they are somewhat tolerate of me taking photos, but they expect me to get a shot in a few minutes whether the lighting is right, or the tide is wrong. When I am by myself or with other photographers there is no problem setting up and spending an hour at a location waiting for just the right conditions and getting the best shot I possibly can.
It Doesn't Have to Be Far
A photo trip doesn't mean that you have to pack your bags and book a flight. It can be somewhere local, somewhere you can drive to in a day. It's not the destination that is important it is dedicating the day to photography that is going to allow you to take better photos.
Look for Opportunities
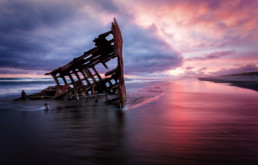
Do you need to travel for work? Perhaps add a day or two onto the end of the trip and go photograph the local sights. I recently did this on a trip to Portland. I was there with friends the beginning part of the week, after dropping them off at the airport I headed West and spent several days photographing the Oregon coast (where I took the photo of the Wreck Peter Iresdale at the top of this post).
I did the same thing when I went to the Palm Springs Photo Festival in April, after the festival I spent a day at Joshua Tree and then an additional day at the Salton Sea finishing off a project there. Airfare was already paid, the car rental actually went down because I was renting for a full week. I just needed a couple of cheap hotels for the extra night.
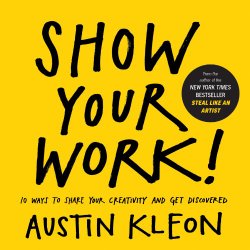
Book Review: Show Your Work
This is the second book by Austin Kleon, I reviewed his first book "Steal Like an Artist" back in April 2012. This new book Show Your Work!: 10 Ways to Share Your Creativity and Get Discovered is tips and suggestions about how to share your work online.
Finding an Audience
As frequent readers of my blog know I write a lot about finding an audience for your work. In this day and age when there are so many artists sharing their work on the internet it can be difficult to get seen and find those people who will truly connect with your work. This gives a lot of tips on how to find this audience and while a lot of them are common sense, listen to your audience, don't hoard your work, don't spam, it never hurts to be reminded.
Motivation
More important than giving me tips on how to find my audience, this book provided me with motivation. It makes we want to get out there and share my work more, connect with fellow creatives, and just get out. This is exactly the sort of thing that also makes me more creative and want to create more. It's a self-perpuating cycle that happens to be going the direction I want to go.
This is an easy read and well worth the time. Pick up a copy and then let me know how you liked it.

Stop Reading This Blog Post!
I'm serious. Stop reading this blog post and instead go out and create! Take an epic photograph! Pick up your camera and take a photo!
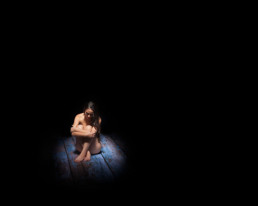
It has been a while since I completed my last photo shoots which were shooting a model at Joshua Tree and then a day at the Salton Sea taking photos for my A Place to Sit project. Instead of going out shooting, or planning shoots, I have instead been reading about photography, watching YouTube videos about photography, updating my photography web sites, and a hundred of other things that are about photography but are keeping me from doing what I love most, CREATING PHOTOGRAPHS!
The Illusion of Photography
It is very easy to get caught up in reading about photography, looking at others photos, sitting on the toilet watching CreativeLive videos on my iPad, and feel like I'm still a photographer, but that is an illusion. There is the illusion that I am making progress when I am being creative and coming up with shoot ideas, however without execution it is pointless. I'm procrastinating.
There are a lot of reasons why procrastination occurs. But for me is comes down to laziness and fear. Perhaps laziness is too strong a word, it is rather I take the path of least resistance.
Path of Least Resistance
It is much easier to sit at my computer and dream about photography than it is to actually do the planning necessary to do for the shot. A lot of my concepts involve building/aquiring props, recruiting a model, scouting a location, finding time on calendar to actually schedule the shoot. It's often daunting for some of the larger shoots. It is so much easier to just sit and think about the project. My solution is to stop thinking about photography and go shoot a damn photo!
So Are You Still Reading? STOP!
Pick up you camera right now and go take a photo. Execute! Photograph! Then once you are done come back and share a link to what you shot!
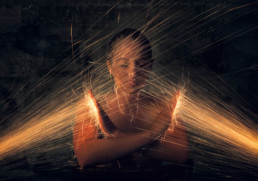
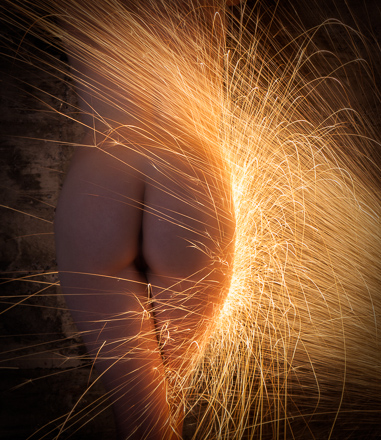
Tutorial - Sparks Photos
Whenever I post one of my Sparks photos I get bombarded with requests on how I achieved the effect. It is a relatively easy effect to but does take some planning and caution. In this post I'll go through all the steps I use in creating these sparks photos.
Disclaimer: This technique is very dangerous and I DO NOT recommend you attempting this yourself.
Concept
The idea behind the sparks photos are to bounce a shower of sparks off of the models body. This is accomplished by doing a long exposure shot and generating the sparks using an angle grinder.
What you will need
- Tripod
- Intervalometer or an assistant.
- Angle Grinder
- Cold Roll Steel bar stock(IMPORTANT – It must be cold roll steel, most other metals generate hot sparks that will burn your model).
- Safety Glasses
- Fire Extinguisher
– 10lb AB or ABC
Safety
There are lots of ways to hurt yourself and your model when doing sparks photos and again I recommend you DO NOT attempt this. The dangers are fire, flying projectiles, burns, and getting particles in your eyes. If you are dead set in trying this technique be sure to follow some common-sense safety practices.
Fire
Area - Do not attempt this in an area where there is combustible material. All my shots are done in a concrete room with concrete walls and floors. This could also be done outdoors at the beach, but I would not attempt it around trees, or dried grass. Also have a fire extinguisher with you and within reach! Don’t use one of those small wimpy fire extinguishers, get a decent sized one, I recommend a minimum of a 10lb AB or ABC extinguisher.
Clothing - I only use nude models for these shots so there is no danger of any clothing catching on fire, do not use this technique on clothed models.
Hair - Hair also burns so be sure the models hair is up in a bun and away from the sparks. There should be no gels or other hair styling product in the model's hair as many of these products are flammable.
Flying Projectiles
The angle grinder is spinning very fast and can propel chunks of metal at high velocities towards your model. It is fast enough to penetrate the skin which is not a good thing. You want to make sure that no pieces of your cold-roll steel are going to break loose and be thrown at your model. You also need to have a large enough piece of cold-roll steel that you can safely grip it. I recommend flat bar stock at least 1.5” wide and 14” long. As you grind the metal it is going to get thin in places and can possibly break loose, so before each series of shots break these pieces off by hand (or grind them off)
Eye Protection
The sparks the grinder is throwing off are red hot particles of metal which can do serious damage if they were to get in your eyes. Everyone in the room should wear eye protection! If the model’s face is visible in the shot then they should close their eyes whenever the grinder is running. If you want a shot where the models eyes appear open, take a shot without the sparks with their eyes open and then have them close their eyes and shower them with sparks. You can then merge the two images in Photoshop to make it appear that their eyes were open in the shot. Never throw sparks at the model while their eyes are open!
Burns
The sparks are particles of burning metal and can burn the skin. There are several ways to minimize this, one is to make sure you use cold-roll steel. The sparks that are thrown off are much cooler than other metals such as hot-roll or stainless steel. The sparks cool off as they travel away from the grinder, so they will be hottest close to the grinder and cooler the further away you get from the grinder, so stand back away from the model. I am typically 5-6 feet away from the model when showering them with sparks.
Alright, now that we got all that out of the way let’s move on to the setup.
Setup
Setting up your camera.
Use a tripod - Because these shots use long exposure your camera needs to be on a tripod. The type of tripod is not important as long it holds your camera steady.
Turn off Image Stabilization - If the lenses or camera you are using has image stabilization, turn if off.
Turn off Auto Focus - Because you are shooting long exposure you will want the room to be fairly dark. As a result of this the camera will probably have trouble auto-focusing, so I recommend setting your camera to manual focus. Compose your shot, focus on the model and you should be all set.
Interval Timer (Intervalometer) – If you are shooting with an assistant then an interval timer is optional. But if you are shooting alone is essential, since you cannot be using the angle grinder and pushing the shutter button at the same time. Here are the settings I use on my interval timer:
Initial delay: 10 seconds
Interval between shots: 1 seconds
Exposure length: 3 seconds
Number of Exposures: 6
The initial delay gives me enough time to start the Intervalometer and get in to position with the angle grinder before the first shot. I then start the grinder and will shower the model with sparks for 24 seconds (3 seconds exposure + 1 second interval) * 6 exposures. Some models can’t tolerate the sparks for that long, so I will stop when they tell me and let the camera take shots until the interval is complete and then delete the shots with no sparks.
Lighting
I use 3 types of lighting for my sparks photos and each give a slightly different look. I recommend you try all three methods to determine which look you like best.
No lighting – I make the room completely dark and just rely on the sparks to generate the light in my photograph. This often requires longer exposure times, or higher ISO which may not be desirable. The longer exposure times will often cause the model to be blurry because of slight movements. High ISO can result in noise in the image which may or may not add to the image. Give it a try.
Modeling Light – I setup one of my strobes with a large softbox and turn on the modeling light and use the light from that modeling light as my only source of illumination. Because of the long exposures the modeling light will result in a pretty good fill light and will give a little more definition to the model’s body.
Strobe – Using a strobe will freeze the model in the image and can minimize any blur caused by movement of the model during the long exposure. I will match the power of the strobe to the aperture setting I am using on the camera, typically either f/5.6 or f/8.
Camera Settings
I always start off with the following camera settings
Shutter Speed: 2 sec
Aperture: f/8
ISO: 100 if using modeling light or stobe, 800 if using no lighting.
I will then take a few shots and adjust my settings as necessary. If there are too many sparks or the majority of the sparks are over-exposed I will lower the shutter speed to 1 sec. The faster the shutter speed the fewer the sparks, and visa-versa.
Taking the Shot
Posing Considerations
There are several things to consider with posing.
Because these photos are done with a long exposure you need to make sure the model can hold the pose for the duration of the shot. They need to be balanced and it helps if they arms are somehow supported. For the image where the sparks are bouncing off the models hands, she rested her forearms on the back of a chair so they would not move during the shot. For the photo below of the model appearing to drink the sparks, her elbows are resting on the back of a chair so that her hands don't move during the long exposure.
The most interested poses are ones where there is a contour to the body that the sparks much follow. Something that is going to block some portion of the sparks, or a nice curve to the body that the sparks can outline.

Grinder technique
Using the grinder to throw the sparks takes practice. You want to have a continous stream of sparks coming off of the grinder. This is not always easy because you are also sweeping the grinder back and forth to spray the sparks along the model's body. This sweeping movement tends to make the metal not maintain good contact with the grinder.
If your grinder has a shield on it, I often will use the shield as a pivot point for the metal bar. I will rest a portion of the bar on the shield and then lever one end into the grinder. This helps me maintain the stream of sparks.
Once you have a stream of sparks going you want to sweep your arm up and down (or left to right), to direct the sparks against the model. Again this takes practice and it is recommended you practice first without the model.
Multiple Exposures
I will often take multiple exposures and combine them in Photoshop after the shoot. I do this for shots where I want it to appear the model's eyes were open. I first take a shot with no sparks and the model's eyes open, and then will have them close their eyes and take another shot with the sparks. I then combine these two photos using Photoshop.
I also use multiple exposures when I want to have sparks coming from multiple directions (as in the photo at the top of this post). I will first take a shot with the grinder on one side of the model and then I will take another shot from the opposite side then combine the two shots in Photoshop.
Conclusion
As I said in the introduction, this is dangerous and I recommend that you DO NOT attempt it. But if you do, share your photos with me, I would love to see them. :)

Book Review - A Beautiful Anarchy
A Beautiful Anarchy: When the Life Creative Becomes the Life Created by David duChemin is probably one of the best books I have read this year. It talks about where creativity comes from, why the muse often leaves us, and how do we get her back. This is a very personal book and it mirrored many of the creative issues I and all creatives are plagued with. It is not about photography per se, although there are a fair number of references to photography, it applies universally to any artist. This book gives a road map so you can take charge of your creative life and become more focused in your art.
If you have read any of David's other works there will be some repetition, but repetition is a good thing. It is so easy to forget the lessons and fall back into feeling uninspired and not knowing where your art is taking you. This is the sort of book I will re-read over and over until the lessons are a part of who I am.
In case you haven't figured it out I found this book inspiring and I highly recommend it to all creative artists.
My Photography Fear
I'm Afraid to Schedule a Photo Shoot

My Solution
How Do You Overcome Your Fear of Failure?

Behind the Scenes Rainbow Multiscapes
This shoot was one of the most difficult shoots I have ever done but also one of the most gratifying.
The Concept
Over the first half of 2013 I had shot and completed my Multiscapes series and was looking for a follow-on. In December of 2013 I worked with the amazing body painter Trina Merry on a shoot for Brand X Liquid Latex and was looking at some of her past work when I saw her rainbow painted hands. I had seen this photo before, but this time I had an epiphany to redo my Multiscape series with 7 models painted with the colors of the Rainbow.
The Challenge
With Trina was on board, the challenge became finding 7 models and a date that would work for all 9 of us involved. It ended up taking 3 months but we finally set a date for late March.
Construction Time
With the shoot a week away I realized that I needed something to elevate the rear-most models. With the Multiscapes where I had 5 models I used pallets and pads for the rear 3 models, but that wasn't ideal for 7 models, so I decided to build an angled platform for the models to lay on. It ended up being 8'x8' with a 16" rise from the front to the back. I thought I was all set and then 2 days before the shoot I had another shot idea where I wanted the models to sit on boxes at different heights to simulate the curve of a rainbow. So in one day I built this stand.
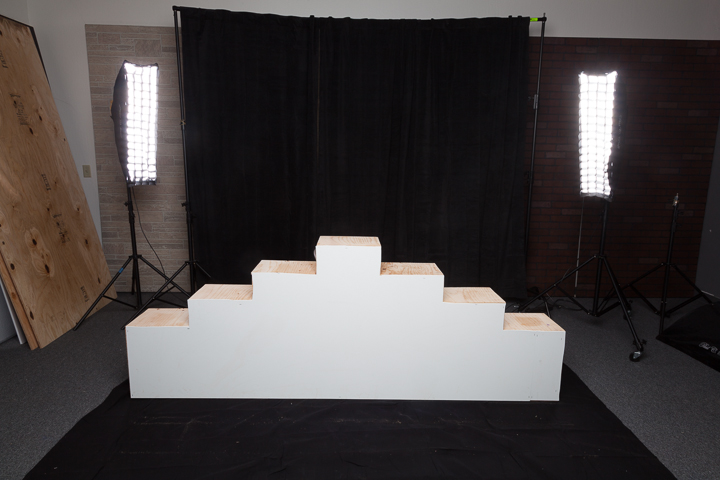
Haven't edited the photos with this prop yet, but it worked great.
A Model Flakes
The night before the shoot one of the models told me her ride flaked so she wouldn't be able to make it. I panicked at first but then realized there were a lot of ways to solve a transportation problem. So have some discussion she agreed to ride the train from San Francisco down to San Jose where I would pick her up. Crisis averted or so I thought.
Day of the Shoot
We had a 9am call and everyone was on time except for the model that was taking the train. Turns out CalTrain had a system wide computer failure that morning and the trains were a mess. The normal 1 hour ride was taking 2-2.5 hours. I texted the model that it was no problem we would just paint her last and let me know how it was going. Radio silence, no response at all from the model. I called, I texted, no response. In fact she has never communicated with me since the night before the shoot.
So I admit I did have a little panic at this point. We could do the colors of the rainbow with 6 models, but compositionally odd numbers work so much better. So Trina, myself, and all the models started contacting every model we knew trying to find a replacement. In the meantime the painting began. Around 11am I finally found a replacement model who was an hour away and was on her way. So crisis averted.
Painting the rainbow colors went relatively quickly and by noon everyone was pretty much painted, but Trina pointed out that they looked a little blah and suggested adding patterns over the base color. That sounded great so she got started only to find out that her air brush compressor wasn't working very well. So she went to her studio 20 mins away to get a replacement. We finally got back on track in the early afternoon. Adding the patterns turned out to be a long process but finally around 6pm we were ready to shoot.
The Shoot
Unfortunately I never took a shot of my setup for this shoot. For lighting I used to gridded strip boxes behind the models at 45* to the camera pointed towards the camera. I also used a 60" Parabolic umbrella on a boom arm over the models and angled slightly away from the camera.
I had a shot list with over 30 shots I wanted to get and we worked through them fairly quickly. The total shoot time was little over 2 hours. All of the models where great and we had a lot of fun on this shoot.
Behind the Scenes video of the shoot.
Behind the Scenes - Rainbow Mutliscapes from Craig Colvin Photography on Vimeo.
Credits
This shoot would not have been possible without the support of the models and Trina Merry. Thank you all.
Bodypainter
Trina Merry
Models
JenJen Wong
Syren Lestat
Anna Rose
Kerstin Tuning
Poisoned Grace
Venus Star

Palm Springs Photo Festival 2014
I just returned from a week at the Palm Springs Photo Festival. It was my first time going and won't be my last. If you are not familiar with the festival it is an annual event and is in it's 10th year. It has an unusual mix of professional photographers. covering the spectrum from commercial photographers to fine art photographers. Many of the workshops are taught by working photographers who have never taught or shared how they do their photography before. I'm used to going to workshops or conferences where the person teaching had become more a photography educator and than an actual working photographer. A lot of this is just the nature of the industry today, it is getting harder and harder to make a living as a professional photographer, so they supplement their income by teaching classes. While there were a few instructors at the Palm Springs Photo Festival that fit that pattern, there seemed to be more who don't regularly teach. I don't know if this is a good thing or not, but I found it interesting. It also meant I got to take a workshop from someone I would otherwise never get to learn from. One of my inspirations...
Glen Wexler
Glen is a successful commercial photographer that started off shooting record companies and then expanded into to shooting ad campaigns. His work is engaging and unusual. He relies a lot on composititing and that was what first attracted me to his work. This was the first time that Glen had ever taught a class and he went into great depth and detail about his work and how he accomplishes his shots. It was very educational and is going to change the way I approach my conceptual photography in the future. For instance he almost always shoots his backgrounds first then works on the foreground elements. The idea being that it is easier to match the background lighting in the studio when shooting the foreground elements. He also shoots a lot of miniatures, both miniature sets and objects that are placed into the composition.
Symposiums
Each night there would be a Symposium where one or two of the instructors would do a presentation about themselves and their work. After attending the first night it became a must attend event every evening. Some of the presentations were very moving, some very funny, but every single one of them was inspiring in one way or another.
Inspiration and Recharging
Speaking of inspiration I had a conversation with a fellow photographer one evening and she commented that the best thing about conferences like this was only the workshops, portfolio reviews, and talks, but just being around other photographers that shared your passion and that it was impossible to come to and event like this and not leave recharged and inspired.
I know that is the case for me, I get so caught up in my day to day work and the drudgery of post-processing 40 photos from a shoot I promised to do for a friend's birthday party that I slowly stop coming up with ideas of what to shoot, or even the desire to go out and shoot. But everything I go to a photography workshop, conference, or event I come back ready to go with more ideas than I can possible shoot. Can you relate to that?
Next Year
I'm already marking my calendar for next year's Palm Springs Photo Festival. Come join me, I'll buy you a beer.
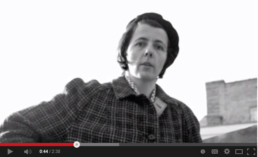
Finding Vivian Maier
This movie is currently in theaters and if you get the chance I highly recommend it. It is a facinating documentary about the nanny Vivian Maier who took tens of thousands of photos during her life but never showed them and they were not discovered until after her death when an individual purchased a box of negatives at an auction.
I had previously heard about Vivian Maier from new reports when her work was first discovered and I had recently watch the Art of Photography episode about her work https://www.youtube.com/watch?v=66oDaqgdTyI
The documentary is very thorough and tells a lot about Vivian through inteviews with her past employers and the children she used to nanny. I highly recommend it.
Have you seen the movie? What did you think?
This Week in Photo (TWiP) Podcast #356
I was co-host on this week's episode of TWiP with Joseph Linaschke and Darlene Hildebrandt.
Check it out.
http://www.thisweekinphoto.com/2014/twip-356-riding-dropbox-carousel/
We discussed the following topics
- Dropbox launches Carousel for organizing and sharing photos
- Canon undercutting professionals by offering discount portrait sessions
- Lensbaby turns to Kickstarter to create a new lens for the iPhone
Check it out!