
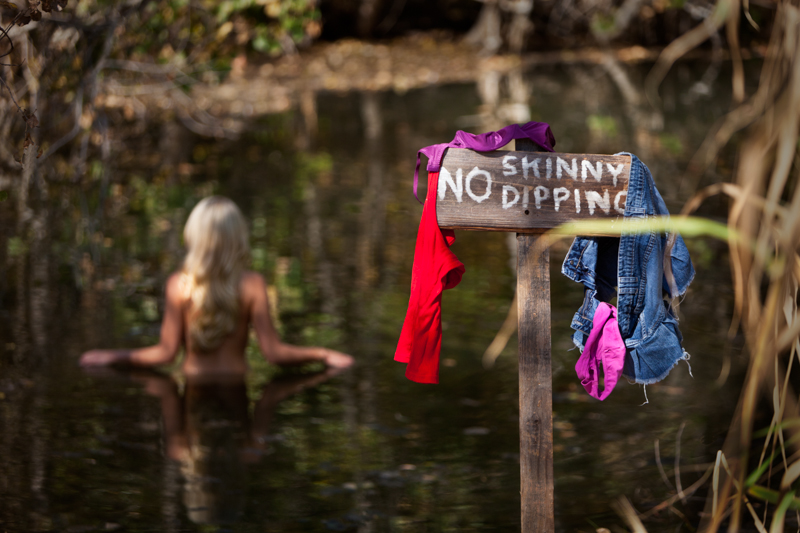
Published in LensWork Extended Magazine
![]()
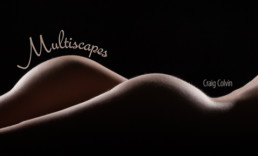
I am honored to have my Multiscapes Series appear in LensWork Extended issue #110.
LensWork published 17 of my images from my Multiscapes series, here are a few samples from the series.
Project Origin
The impedius for this project was a photo trip to Death Valley in March 2011. I spent multiple sunrises and sunsets photographing the beautiful Mesquite Dunes and on one particular morning I took a shot of 3 dunes that reminded me of the curve of the female form. I had often done bodyscape photos with a model in the studio, and when I returned from Death Valley I used Photoshop to superimpose these bodyscapes onto the dunes.
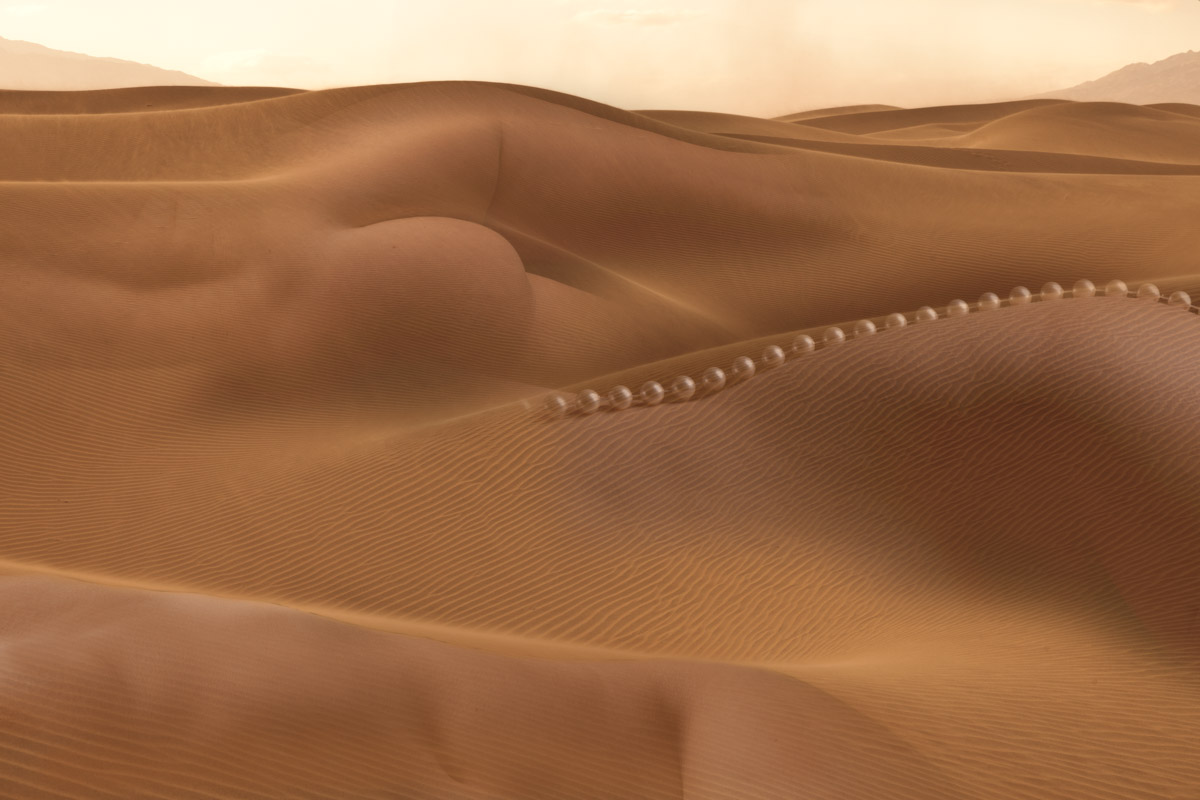
This was the start of a new project where I would use photos of models taken in the studio and combine them with photos from nature. I used rocks, sand, dunes, clouds, and other elements from nature that resembled the curves in my models.
Multiscapes
Up until March of 2013 I had only used a single model for my bodyscapes, but in March I had the opportunity to shoot bodyscapes with 3 models. After a few shots I was immediately struck with how in certain poses the models looked just like the dunes I had photographed in Death Valley. I took a break and quickly sketched some poses in my notebook that were reminiscent of dunes and resumed shooting. I soon was recruiting additional models to do these "multiscapes", and reviewing my old photos looking for curves in nature that would work for these bodyscape shoots.
Free Wallpaper
I am offering a Free Multiscape image as wallpaper that you can use on your desktop, laptop and moible devices. To download your free image, subscribe to my newsletter using the form below. This newsletter will keep you informed about all of my future projects and exhibits.
[one_half]

Collect Art! Art is meant to be shared.
Own one of my Multiscape photographs.
More info
[one_half_last][/one_half_last]
How I Got the Shot - Holey Wall Effect

This is first of a series of articles on "How I Got the Shot". In this installment I will describe what I call the Holey Wall effect.
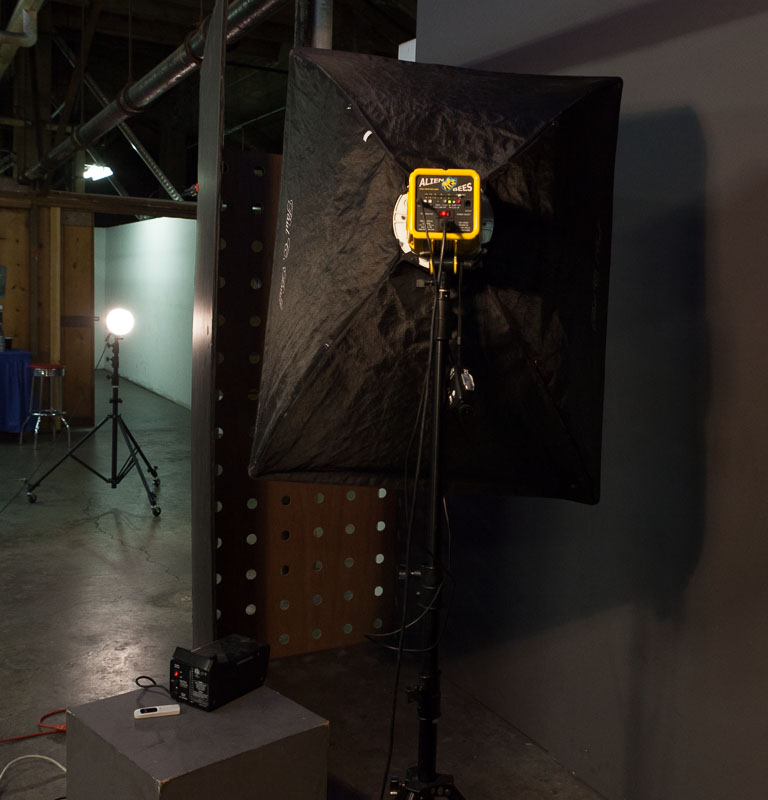
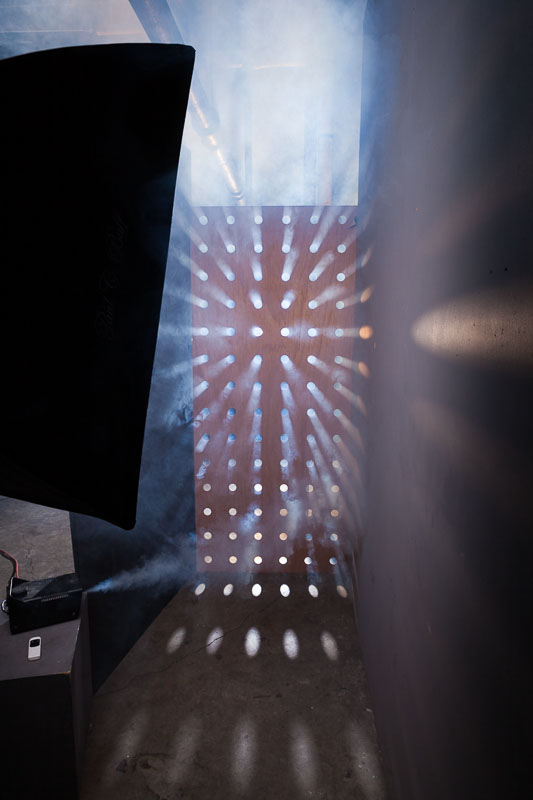
The Holey Wall effect is a relatively simple setup but it can produce some very stunning images. This is a description of how I created this effect. The basic idea is to have streams of light coming from behind your subject. You can control the shape of these streams of light by placing different gobos between the light source and your subject. For this example I constructed a wall with holes in it.
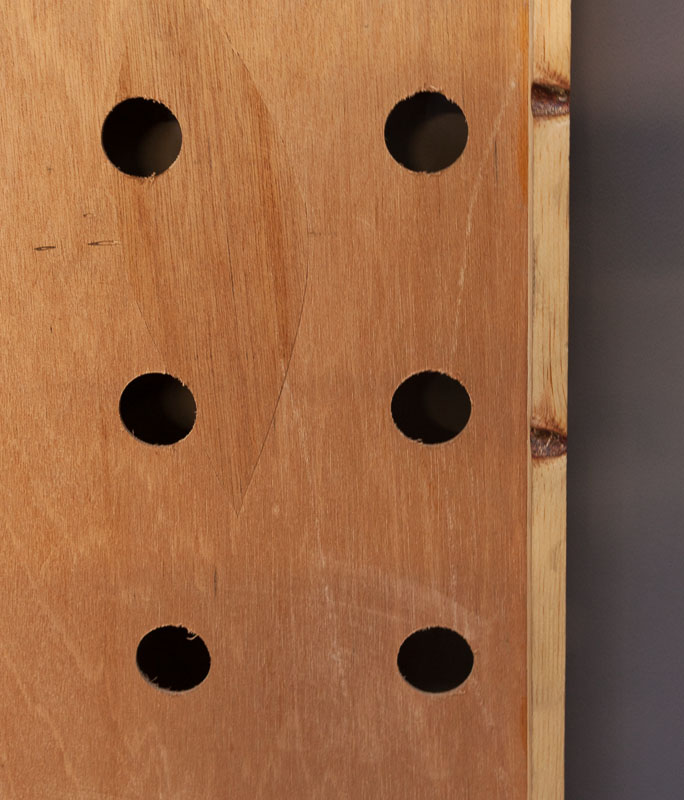
Constructing the Holey Wall
The "wall" is a piece of 3'x8'x1/16" Luan. Luan is often used for door skins and is a very thin plywood. It is so thin that if bends so I added a wooden frame two wood ribs along the back side of the sheet of Luan to give it rigidity. The ribs where created with 3/4"x3/4" Pine and runs vertically on the backside of the sheet of Luan. The holes cut into the Luan are 1-3/4 inch diameter and are spaced 6 inches apart across the entire board to end up with a grid of 6 holes horizontally and 14 holes vertically.
[one_third]
[/one_third]
[one_third]
[/one_third]
[one_third_last] [/one_third_last]
Holey Wall Alternatives
If you don't want to deal with a wood wall, the holey wall can be constructed with any other opaque material. Black foam core board would work great, as would a heavy fabric such as canvas or velvet drapes. If using fabric you want to insure that fabric is opaque and will block all the light coming from behind, except where you cut the holes.
Setup
For the best effect you don't want any light coming around the side of the holey wall. There are numerous ways to accomplish this, I often use two 4'x8' form core boards, one on each side, to block the light. Another effective technique is to place the holey wall board in a doorway so the walls around the door block the light. For this example I used a wall on one side and a foam core board on the other.
Lighting
Back Lighting
The back light is what creates the beams of light coming through the holey wall. To get the best beams you want to use a hard light source behind the holey wall. I use an Alien Bee 800 with a bare reflector. The further away the light source is from the holey wall the harder the light. I place the light 12 feet away from the back of the holey wall, however if you don't have that much room I have achieved effect with the light only 6 feet away. The power should be set to 1-2 stops over the front light.
Front Lighting
I use a large softbox on the front side of the holey wall to light up my subject. This is providing fill light to the front of the subject and should not be so bright that it overpowers the beams of light. I typically will set the front light to be 1-stop under the back light.
[one_third]
[/one_third]
[one_third]

[/one_third]
[one_third_last]
 [/one_third_last]
Fog
Fog is an important component to achieving this effect, it is what causes the beams of light coming through the holes to be visible. I use a cheap fog machine that I purchased after Halloween from a Halloween store. It is not the greatest fog machine, it will produce fog for approximately 1-2 minutes after which it has to recharge for 2-3 minutes. So the shooting is sporadic, you shoot for a couple of minutes and then have to pause and wait for a couple of minutes. I plan to solve this in future shoots by having a second fog machine that I can alternate between.
I aim the fog behind the subject so it is between the subject and the holey wall. It helps to have an assistant who can direct the fog both high and low so you get complete coverage. You want to avoid having much fog between the subject and the camera. This can be a challenge and I will often have to wait until the fog has dissipated before resuming the shoot.
[one_third]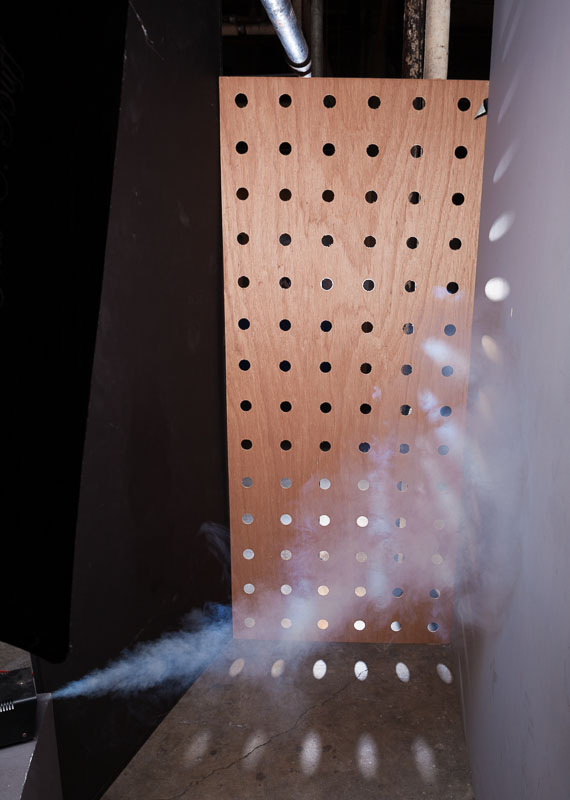
[/one_third]
[one_third]
[/one_third]
[one_third_last] [/one_third_last]
Post-processing
I do my standard Glamour post-processing (click here to download a video tutorial) techniques on these holey wall images with the exception that I only do selective skin softening. If there is fog between me and the subject I don't soften the skin behind the fog as it is not needed. To get the color effect you see in the image above I used Nik Color Efex Pro.

Conclusion
The Holey Wall technique is a relatively easy technique that can produce dramatic looking photos. Give it a try and post a link to your photos in the comments below, I would love to see them.
The plans for constructing a holey wall and lighting diagram are available for download. Click here to get a copy.
Behind the Scenes at the Brand X Liquid Latex Shoot
The above video shows the behind the scenes of the shoot but is also an advertisement for Brand X Liquid Latex and describes some of the techniques used.
Concept
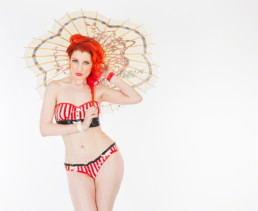
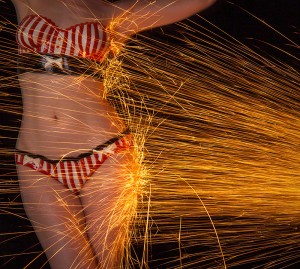
The concept was a pinup style shoot with a liquid latex pinstripe bikini painted onto the model. The model was the lovely Ulorin Vex and the body painter was the very talented Trina Merry.
This was turned out to be a challenging shoot for several reasons.
Challenge One - Space
It was cramped. The shoot was in a small conference room and had me and the full video crew competing for space. There were 4 people shooting video and timelapse with 6 cameras. They had their own lighting plus all the various video paraphernalia like sliders and boom arms.
Challenge Two - Time
Hair, makeup and body painting took over 6 hours leaving me with just a little over half-hour to shoot. Luckily Ulorin was the model, she is amazing and requires little to no direction. I would hand her a prop such as a candy cane and she would come up with amazing poses as fast as I could click the shutter. We went through a dozen concepts in 40 minutes and 90% of the photos were keepers. I could not have pulled it off without a professional model like Ulorin.
The Photos
[one_third]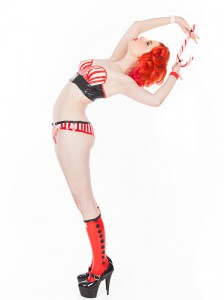 [/one_third]
[one_third]

[/one_third]
[one_third_last]

[/one_third_last]
[one_third]

[/one_third]
[one_third]

[/one_third]
[one_third_last]

[/one_third_last]
[one_third_last]
[/one_third_last]

5DayDeal - The Complete Photography Bundle
 What will 2014 mean for your photography?
How would your photography change if you could get your hands on some of the top products by some of the top creators in photography?
What if you could get it all in one place, one clean package, and for one incredible price?
This may top what Santa got you.
For 5 days only - January 5 at noon EST till January 10 at noon EST - the team over at 5DayDeal have put together a pack of tools to revolutionize your photography and made it available in a bundle for over 90% off!!
Over $1200 of photography tools for ONLY $89
That's one killer sale!
But that isn't all. The bundle also includes over $400 of awesome discounts for even more photography products bringing the total value of the bundle to...
... wait for it...
over $1700!! (over 94% off)
What’s the catch?
It is only available for 5 days.
These full products, offered by some of the biggest names in photography, are offered together for one crazy low price for ONLY 5 days.
Incredible right?
5DayDeal has combined training, tools, and inspiration in the form of ebooks, presets, and video to cover a huge range of photography including HDR, long exposure, fashion, food, portraits, business tools and so much more.
The bundle is packed with tools for beginners all the way through advanced and professional photographers.
If you're interested in photography, your gonna love this bundle!

What's included?
Ebooks


- An Introduction to Landscape Photography at Night - by Alister Benn $5.00
- Understanding Lenses Part 1: A Guide to Canon Wide-Angle & Kit Lenses - Andrew S. Gibson $11.00 (converted to US dollars)
- Photographing the 4th Dimension: Time - Jim Goldstein $20
- I | We - Scenes From The Big Picture - Karen Hutton $9.97
- Essential Light: Photography’s Life Blood - Richard Bernabe $7.95
- Crowd Control - Corwin Hiebert $9.97
- Powerful Imagery - Mitchell Kanashkevich - $14.90
- Tasty Food Photography - Lindsay Ostrom $19.99
- The Art of Photographing Wildlife - provided by Gordon Laing $10.00
- The Long Exposure ebook - David Cleland $5.00
- A Practical Guide to HDR Vertorama Photography - Klaus Herrmann 19.95
- Printing 101 Notebook - Ron Martinsen $19.97
- Seeing the Light - Mitchell Kanashkevich - $12.00
Photography e-courses
- HDR Photography Essentials pack - Alex Koloskov - $49
- The Photographer’s Workflow - Gavin Gough $30
- Big World Little Lens - Justin Balog $9.97
Presets and Actions

- Eddie Tapp’s Personal Action Set - Eddie Tapp $50.00
- MBP Fine Art Print Border Scripts - Martin Bailey $12.00
- Creative Control Preset Pack - Nicole S. Young $50.00
- Fashion Presets 1 - Lindsay Adler $25.00
- Black and White Photoshop Action Suite - Bill Jones $29.00
- ApertureExpert Adjustment Preset Pack (Film and Funk/Split Tone) & Live Training - Joseph Linaschke $17.98
- James B Lightroom Presets Bundle - James Brandon $19.97
- Fairytale + Princess + 3 Bonus Super Pack Photoshop Actions - Amanda Diaz $108
- Lightroom Presets Volume 2 - Lights - Serge Ramelli - $27
- Alexandra Sophie's Film Action Pack - Alexandra Sophie - $55
Video

- The Photographers Guide to Creating HD Video with the Canon EOS 5D Mark II & 7D - Juan Pons and Rick Sammon $49.99
- Snapseed - The Definitive Guide - Justin Balog $20
- Post Edgy Photoshop Techniques - Joel Grimes - $99
- Color Grading Tutorial - Jaime Ibarra - $200
- The Art of Black and White With Lightroom - Serge Ramelli - $57
Textures & More


Software


If that isn't enough, check out these awesome discounts you get when you purchase the bundle


- Designing an Image - Lindsay Adler $112.00 off (50% off current price)
- Topaz Adjust - Topaz Labs $25 off
- Iacrylic - $10 off a $50+ product
- Mastering Star Trail Photography - Jim Goldstein (35% off or 35$ off)
- Graph Paper Press Forever Plan - 50% 149.50
- Perfect Photo Suite 8 Premium Edition - OnOne Software $30 off new (not upgrade)
- 10 Common Photography Mistakes (and how to fix them) - James Brandon $14.98 off
- Blurb Book - printed copies only $10 off of $50 order in either CA or US - blurb.com
- Learning the Art of Mobile Photography - Justin Balog - FREE $35 value
- The Photo Frontier Lightroom Presets - Justin Balog $20 off + bonus of 5 presets only offered to 5DayDeal customers
- Moab Landscape Photography - Justin Balog - $50 off

But remember the catch?
This is only available for 5 days. January 5 noon EST - January 10 noon EST.
There's More
For every bundle sold 5DayDeal will donate 10% of the sale price ($8.90) to charity.
Charities included are:
- SeedLight - offering creative opportunities to children in disadvantaged communities all around the world
- HeART Speak - bringing photography to high-intake animal shelters around the US
- Flashes of Hope - providing free portrait packages to over 50% of kids diagnosed with cancer in the US
- OpLove - providing photography to US armed service members deployed to combat zones and their families
- Charity Water - providing clean water to communities all over the world
- Davis Phinney Foundation - helping people with Parkinson's live well today
What will 2014 mean for your photography?

More Info:
- Got more questions - check out the Q & A page on the 5daydeal site - here
- The sale is from noon EST January 5, 2014 through noon EST January 10, 2014. There will be no late sales.
- If you make a purchase through my link I make an affiliate commisison. Thanks for supporting my site.

Plan to Improve your Photography in 2014
Almost every photographer I talk to wants to improve their photography. But when I ask them how they are doing that, they will have no plan or just vague thoughts about perhaps getting around to watching some online tutorial. Not a very efficient or practical way to improve.
Photographic Goals
- Become a Better Photographer
- Grow my Photography Audience
- Create Epic Photos
What's Your Target
Create a Roadmap
- Become a Better Photographer
- Attend one workshop or conference every quarter
- 30 mins of photography education every day (see this blog post)
- Schedule one photowalk every month
- Schedule one photography trip every quarter (Oregon Coast, Zion, Boston, Page)
- Grow my Photography Audience
- Post 2 photos/week on social media sites
- Submit every new project to print publications until it is published
- Enter a photo contest very month
- Pursue and participate in a galley show every quarter
- Create Epic Photos
- Schedule one large production shoot every quarter
- Complete 4 current photo projects
- Shoot Multiscapes II in January
- Shoot one conceptual photo each month
- Schedule 3 shoots to complete Paper Doll project
- Edit and compile Reflections photos
- Start 4 new projects
Plan to Improve Your Photography in 2014

My Photographs Suck, a Review of Zack Arias' New Book
My Photographs Suck
I often look at the photos in my portfolio and say to myself, "My Photographs Suck". They didn't suck when I took them, they didn't suck when I was post-processing them, the didn't suck when I posted them to my various social media and photo sharing sites like 500px or ModelMayhem. But after a few weeks go by and the emotional high of the shoot has worn off, I start to see the flaws, the piece of hair I should have cloned out, the bright spot in the upper left I should have darkened, the awkward left arm of the model. Man this photo sucks!
Real Questions. Real Answers.
Backup Cameras and Canon Professional Services

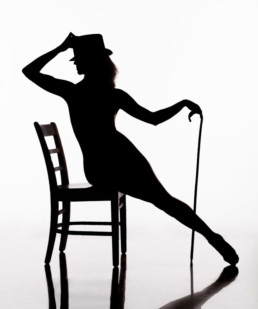
I had 6 shoots scheduled in 5 days this past week. The 2nd shoot was this past Thursday night and was a workshop I was teaching on how to shoot silhouettes. I had 5 students and a model all ready to shoot, I pulled my camera out of my bag and it would not turn on, I thought it was a dead battery, but my 2nd battery didn't work either. Crap! One of the participants, Andy Morris of PhotoshopScaresMe.com ended up sharing his camera with me, so I was able to make it through the workshop.
You Have a Backup Camera, Right?
I used to have a backup camera but I sold it this past May because I had been carrying it around for over a year and had not take a single photo with it. I said to myself that I could always rent a camera from BorrowLenses.com if mine broke. So I sold it and bought a new lens which I would get more use out of. In hindsight, perhaps not the best choice.
Renting a Camera
My backup plan was to rent a camera body. BorrowLenses.com is local so I can pick up a camera and not have to wait on shipping, so I thought I would be covered. Unfortunately they had no Canon 5DmkIIs or 5DmkIIIs available until the following week. Doh! I checked the local camera store which also rents cameras and the price was 2.5x what BorrowLenses charges. I decided that would be plan C if I couldn't locate a camera any other way.
My Network to the Rescue
So I got on my social media and asked to borrow a camera for the weekend. I had a great response from fellow photographers and was able to pick up a Canon 5DmkII from my friend Ben Park (eBenStudio.com) on Friday morning. I used it for my remaining shoots over the weekend and returned it to him on Monday. Thanks Ben!
Canon Professional Services
I still had to deal with getting my camera repaired. So I packed it up on Friday and sent it in to Canon Professional Services (www.cps.usa.canon.com). I have the "Gold" level of Canon Professional Services which gives me a discount on repair services, free overnight return shipping and a 3-day turn-around. They received it on Monday, repaired it that day, I received it on Wednesday so I was ready for my shoot on Thursday. Total charge was $158. The issue was an internal short on one of the circuit boards.
If you are a Canon shooter and you aren't already a member of Canon Professional Services you should be. This is the 3rd time I've made use of their repair services and I highly recommend them.
So What's Next?
I'm still debating how I should prepare for the next time my camera breaks. I'm leaning towards buying another backup camera and am on the lookout for a used 5DmkII. While my photography network came through for me this time, the circumstances might not be as favorable next time, perhaps I'll be in the middle of Death Valley when my camera breaks. I'm not really willing to take that risk, so a backup camera seems like good (although expensive) insurance.
So what is your backup plan?
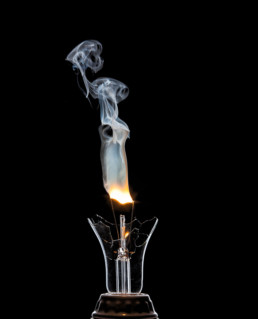
Light Bulb Smoke Photography Tutorial

The photo above shows what I call Light Bulb Smoke Photography. It is capturing the smoke rising from the burning filament of a light bulb. This sort of image is very easy to accomplish and in this tutorial I will explain how you can capture similar images.
How it Works
The glass globe of a light bulb has a vacuum inside it which prevents the filament in the light bulb from burning up. By breaking the glass of the light bulb and letting air get to the filament, the filament will burn and give off smoke when power is applied to the bulb. By slowly applying power to the light bulb you can get it to a point where it starts to glow and burn. The burning filament will smoke and creates interesting patterns. As the power is increased the filament will burn faster and will eventually burn up and break the electrical connection.
Capturing Smoke Inside the Globe

Another techinique is to leave the glass globe intact and break the vacuum by drilling a hole in the base of the light bulb. Because there is no vacuum in the bulb the filament will smoke and burn but smoke will be contained inside the glass globe. This gives another interesting photo opportunity.
Light Bulb Smoke Photography Tutorial - The Video
The following video tutorial shows the setup for photographing Light Bulb Smoke.
[vimeo url="http://vimeo.com/71213783" width="640" height="480" title="0" fs="0" portrait="0"]
Lighting Setup
To light this setup we want just the edges of the light bulb globe to appear lit while the background appears black. This is called Dark Field Illumination. I learned how to do this sort of lighting from this book Light Science and Magic: An Introduction to Photographic Lighting (this is an affiliate link).
In my implementation I placed a large softbox directly behind the light bulb and then taped a black piece of poster board onto the face of the softbox that was slightly smaller than the width of the softbox. The black poster board makes the background appear black. The light on the sides of the poster board highlight just the edge of the light bulb glass.
You will need to adjust the distance of light bulb from the softbox to that just the edges of the light bulb are highlighted. If the light bulb is too close to the softbox then the glass edges will appear black and the glass will not be visible in the image, if the light bulb is too far way then more than just the edges of the glass will be illuminated and you will not be able to see through the glass. So move it back and forth to find the sweet spot.
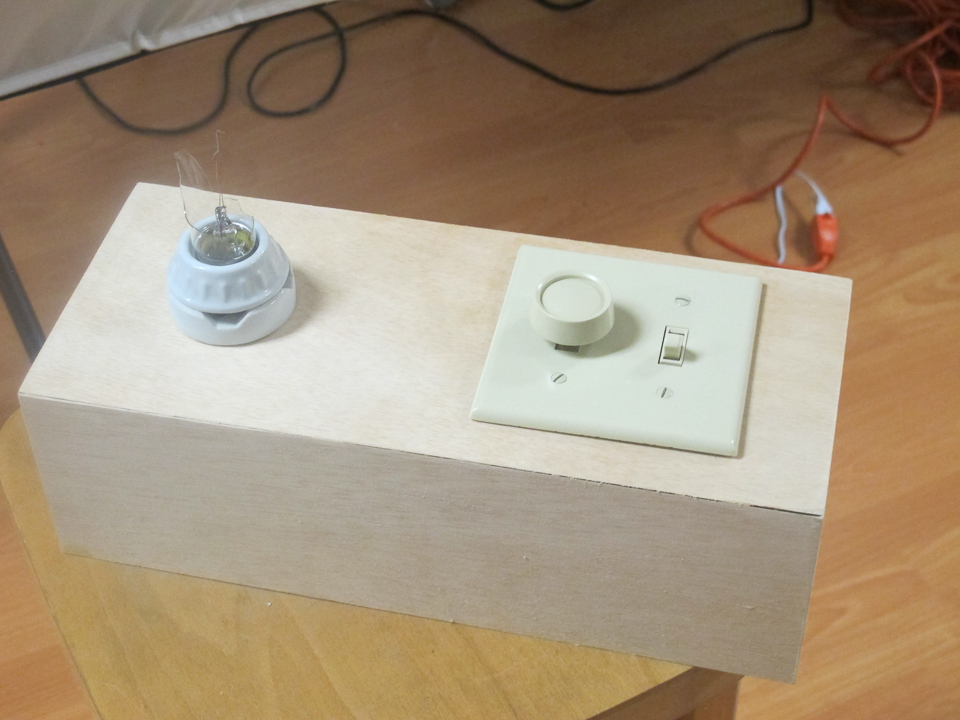
Electrical Fixture
The fixture is relatively simple. It is a wood box that contains a switch, a light dimmer, and a socket for the bulb. There is no need to build a specialized fixture, you could also use a household lamp plugged into a dimmer.
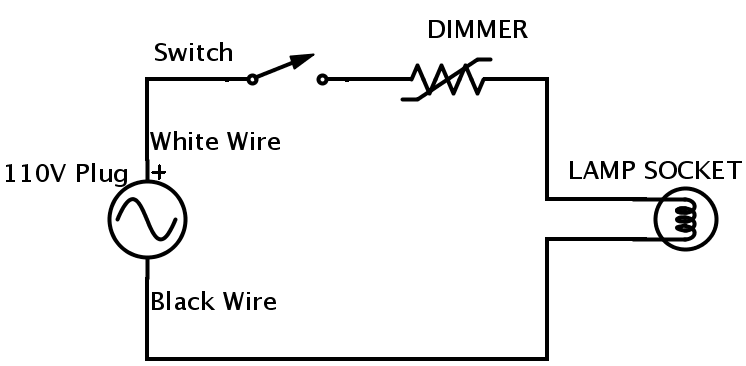
Wiring Diagram
Here is the wiring diagram for the fixture.
The Bulbs
Doing Light Bulb Smoke Photography requires a lot of light bulbs. I look for clear glass globes (not frosted), a simple single filament, and cheap. Here is a link to the ones I used in the above photos Feit Electric 60A/CL/MP-130 60-Watt A19 Household Bulb, Clear, 24 Pack
(this is an affiliate link so if you purchase I make a few pennies. It does not cost you anything additional).
Conclusion
Light Bulb Smoke Photography is relatively easy to do and you can get a lot of interesting shots as the smoke curls away from the filament. Give it a try and share with me any photos you might take. I'd love to see them.
Why I'm Afraid To Take Photos
Earlier this month (July 3rd) Jeremy Cowart posted the following on Facebook "Just realized it's now been over a year since I had my biggest and best idea to date. Still terrified of it though. Will pursue one day. Sigh."
I realized it has been almost almost a year since I executed my last big photo idea and when I stopped to think about why I realized it is because I'm afraid, just like Jeremy.
What am I afraid of?
I love shooting big concepts. It's why I shoot and I constantly have ideas and am coming up with awesome new concepts but I never seem to get around to executing them. I often blame it on not enough time, or the hassle of finding a model/crew, etc. But the bigger reason is my fear of failure. I'm afraid that the image I take won't be as great as the vision in my head. This paralyzes me and keeps me from pursuing my ideas. I want to make EPIC photos, and am afraid that I will end up with just an average photo.
Why do I feel this lack of ability? Why do I think that I can't pull off an Epic photo? Because I've failed in the past. Every failure makes me that much more afraid of the next one.
In my head I have a vision of what the photo is going to look like, I plan, I pull together a crew to assist me, I schedule the shoot, and go shoot it. I then get back to my computer and look through the photos and they are just so-so. They look nothing like the awesome photo in my mind. Sometimes I will salvage something, (which I talked about in my post Turning a Crappy Photo Into a Keeper), but I'm often disappointed.
My Failures
So why do they fail? Here are examples of some big concepts that just didn't work.

The above image was a failure because I took it midday and the lighting sucks. This was just the result of poor planning. I knew the midday lighting was not ideal but thought I would be able to "recover" it in Photoshop. I wasn't able to.

I really liked this concept, and again it fails because of the poor lighting. I had 2 concepts to shoot this day and I wanted to save sunset for the 2nd concept. So the lighting was not ideal for this earlier concept. Lesson learned, don't combine shoots. It's a ongoing problem. I invest a lot of time in setting up the shot and recruiting the models and assistants so I want to maximize that effort, however I've never been happy with the first concept when I try to shoot more than one.
This shot is a failure because the depth-of-field is too shallow. My vision was to have the girl out of focus but not this out of focus. It was very difficult to tell on the camera's LCD how out of focus it was. I should have bracketed my shots and tried some with different apertures instead of shooting everything wide open.
So what do I do?
Some fear is good, it means I'm pushing myself, stretching myself, expanding my photographic horizons, which is going to make me a better photographer. But this paralyzing fear serves no purpose. So what am I going to do about it? I'm going to fight through it. I am to put some shoots on the calendar and go shoot them. The fear is good, it means I'm pushing myself, and that is what is going to take my photos to the next level. I may fail, or I might make that EPIC photo but I won't know until I try.
So what do you do to fight though your fear of failure?

Interview on Model Photography Showcase Podcast

I was honored to be interviewed on Episode 5 of the Model Photography Showcase Podcast. You can listen to the interview here.
The Model Photography Showcase Podcast is a great new podcast hosted by photographer Brian Fischer and model Roxanne Cali. Each week they showcase a different model or photographer and will select photos from their portfolio and discuss how the photo was made. It is a unique concept and is very educational.