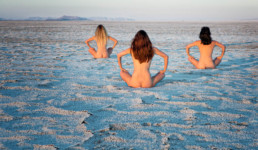
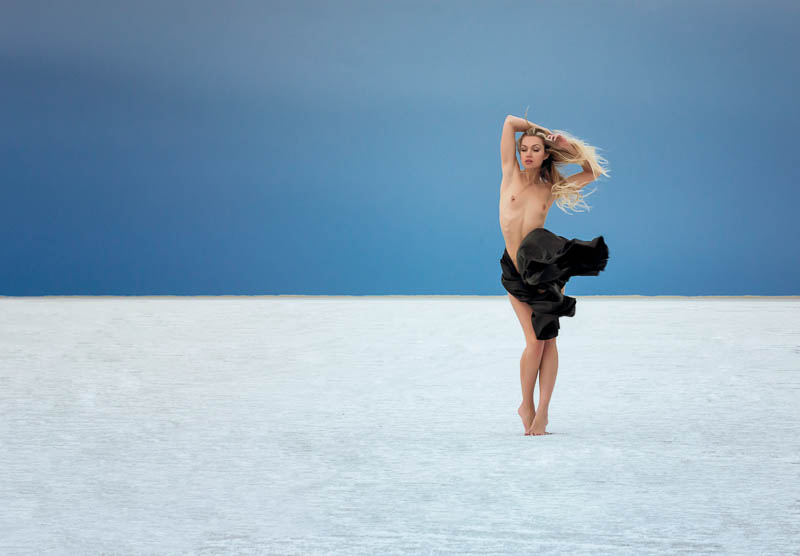
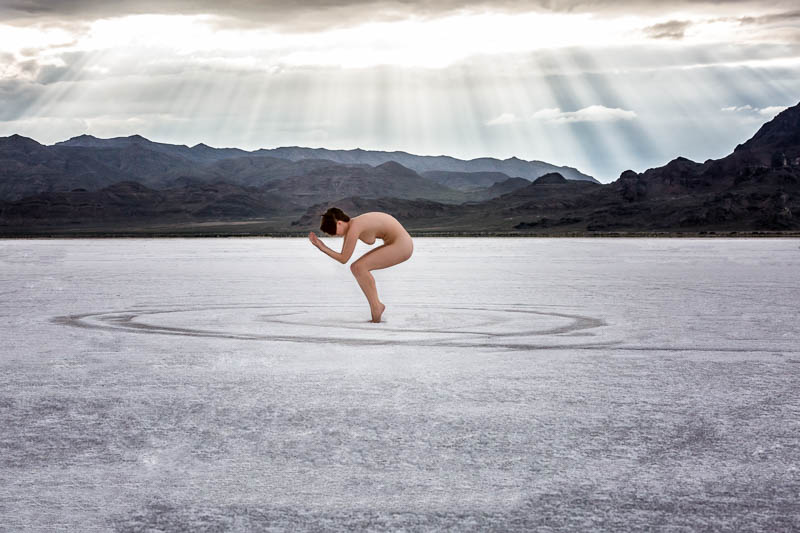
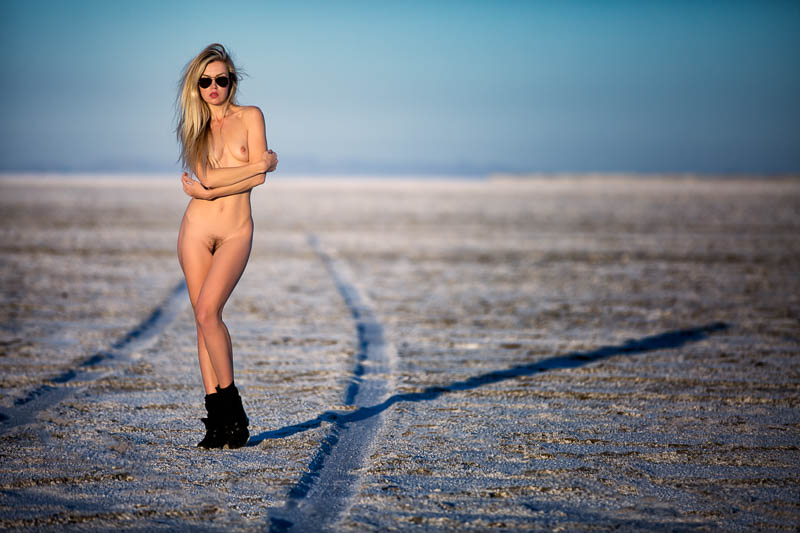
Tips for a Model Shoot at the Bonneville Salt Flats
This is the first of a series of posts about shooting at the various locations that are part of the UTadventure Tours. I will be an instructor on the June 1st-6th tour this summer. Come join me.
Fine Art and Glamour
Play Around with the Background
Shoot High, Shoot Low
Using the Sun
Use the Tire Tracks
Making the Most of the Terrain
Tutorial - Sparks Photos
Whenever I post one of my Sparks photos I get bombarded with requests on how I achieved the effect. It is a relatively easy effect to but does take some planning and caution. In this post I'll go through all the steps I use in creating these sparks photos.
Disclaimer: This technique is very dangerous and I DO NOT recommend you attempting this yourself.
Concept
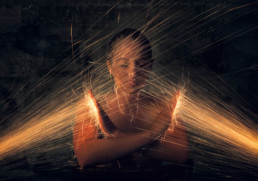
The idea behind the sparks photos are to bounce a shower of sparks off of the models body. This is accomplished by doing a long exposure shot and generating the sparks using an angle grinder.
What you will need
- Tripod
- Intervalometer or an assistant.
- Angle Grinder
- Cold Roll Steel bar stock(IMPORTANT – It must be cold roll steel, most other metals generate hot sparks that will burn your model).
- Safety Glasses
- Fire Extinguisher
– 10lb AB or ABC
Safety
There are lots of ways to hurt yourself and your model when doing sparks photos and again I recommend you DO NOT attempt this. The dangers are fire, flying projectiles, burns, and getting particles in your eyes. If you are dead set in trying this technique be sure to follow some common-sense safety practices.
Fire
Area - Do not attempt this in an area where there is combustible material. All my shots are done in a concrete room with concrete walls and floors. This could also be done outdoors at the beach, but I would not attempt it around trees, or dried grass. Also have a fire extinguisher with you and within reach! Don’t use one of those small wimpy fire extinguishers, get a decent sized one, I recommend a minimum of a 10lb AB or ABC extinguisher.
Clothing - I only use nude models for these shots so there is no danger of any clothing catching on fire, do not use this technique on clothed models.
Hair - Hair also burns so be sure the models hair is up in a bun and away from the sparks. There should be no gels or other hair styling product in the model's hair as many of these products are flammable.
Flying Projectiles
The angle grinder is spinning very fast and can propel chunks of metal at high velocities towards your model. It is fast enough to penetrate the skin which is not a good thing. You want to make sure that no pieces of your cold-roll steel are going to break loose and be thrown at your model. You also need to have a large enough piece of cold-roll steel that you can safely grip it. I recommend flat bar stock at least 1.5” wide and 14” long. As you grind the metal it is going to get thin in places and can possibly break loose, so before each series of shots break these pieces off by hand (or grind them off)
Eye Protection
The sparks the grinder is throwing off are red hot particles of metal which can do serious damage if they were to get in your eyes. Everyone in the room should wear eye protection! If the model’s face is visible in the shot then they should close their eyes whenever the grinder is running. If you want a shot where the models eyes appear open, take a shot without the sparks with their eyes open and then have them close their eyes and shower them with sparks. You can then merge the two images in Photoshop to make it appear that their eyes were open in the shot. Never throw sparks at the model while their eyes are open!
Burns
The sparks are particles of burning metal and can burn the skin. There are several ways to minimize this, one is to make sure you use cold-roll steel. The sparks that are thrown off are much cooler than other metals such as hot-roll or stainless steel. The sparks cool off as they travel away from the grinder, so they will be hottest close to the grinder and cooler the further away you get from the grinder, so stand back away from the model. I am typically 5-6 feet away from the model when showering them with sparks.
Alright, now that we got all that out of the way let’s move on to the setup.
Setup
Setting up your camera.
Use a tripod - Because these shots use long exposure your camera needs to be on a tripod. The type of tripod is not important as long it holds your camera steady.
Turn off Image Stabilization - If the lenses or camera you are using has image stabilization, turn if off.
Turn off Auto Focus - Because you are shooting long exposure you will want the room to be fairly dark. As a result of this the camera will probably have trouble auto-focusing, so I recommend setting your camera to manual focus. Compose your shot, focus on the model and you should be all set.
Interval Timer (Intervalometer) – If you are shooting with an assistant then an interval timer is optional. But if you are shooting alone is essential, since you cannot be using the angle grinder and pushing the shutter button at the same time. Here are the settings I use on my interval timer:
Initial delay: 10 seconds
Interval between shots: 1 seconds
Exposure length: 3 seconds
Number of Exposures: 6
The initial delay gives me enough time to start the Intervalometer and get in to position with the angle grinder before the first shot. I then start the grinder and will shower the model with sparks for 24 seconds (3 seconds exposure + 1 second interval) * 6 exposures. Some models can’t tolerate the sparks for that long, so I will stop when they tell me and let the camera take shots until the interval is complete and then delete the shots with no sparks.
Lighting
I use 3 types of lighting for my sparks photos and each give a slightly different look. I recommend you try all three methods to determine which look you like best.
No lighting – I make the room completely dark and just rely on the sparks to generate the light in my photograph. This often requires longer exposure times, or higher ISO which may not be desirable. The longer exposure times will often cause the model to be blurry because of slight movements. High ISO can result in noise in the image which may or may not add to the image. Give it a try.
Modeling Light – I setup one of my strobes with a large softbox and turn on the modeling light and use the light from that modeling light as my only source of illumination. Because of the long exposures the modeling light will result in a pretty good fill light and will give a little more definition to the model’s body.
Strobe – Using a strobe will freeze the model in the image and can minimize any blur caused by movement of the model during the long exposure. I will match the power of the strobe to the aperture setting I am using on the camera, typically either f/5.6 or f/8.
Camera Settings
I always start off with the following camera settings
Shutter Speed: 2 sec
Aperture: f/8
ISO: 100 if using modeling light or stobe, 800 if using no lighting.
I will then take a few shots and adjust my settings as necessary. If there are too many sparks or the majority of the sparks are over-exposed I will lower the shutter speed to 1 sec. The faster the shutter speed the fewer the sparks, and visa-versa.
Taking the Shot
Posing Considerations
There are several things to consider with posing.
Because these photos are done with a long exposure you need to make sure the model can hold the pose for the duration of the shot. They need to be balanced and it helps if they arms are somehow supported. For the image where the sparks are bouncing off the models hands, she rested her forearms on the back of a chair so they would not move during the shot. For the photo below of the model appearing to drink the sparks, her elbows are resting on the back of a chair so that her hands don't move during the long exposure.
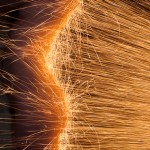
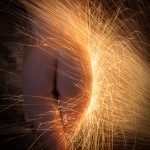
The most interested poses are ones where there is a contour to the body that the sparks much follow. Something that is going to block some portion of the sparks, or a nice curve to the body that the sparks can outline.
Grinder technique
Using the grinder to throw the sparks takes practice. You want to have a continous stream of sparks coming off of the grinder. This is not always easy because you are also sweeping the grinder back and forth to spray the sparks along the model's body. This sweeping movement tends to make the metal not maintain good contact with the grinder.
If your grinder has a shield on it, I often will use the shield as a pivot point for the metal bar. I will rest a portion of the bar on the shield and then lever one end into the grinder. This helps me maintain the stream of sparks.
Once you have a stream of sparks going you want to sweep your arm up and down (or left to right), to direct the sparks against the model. Again this takes practice and it is recommended you practice first without the model.
Multiple Exposures
I will often take multiple exposures and combine them in Photoshop after the shoot. I do this for shots where I want it to appear the model's eyes were open. I first take a shot with no sparks and the model's eyes open, and then will have them close their eyes and take another shot with the sparks. I then combine these two photos using Photoshop.
I also use multiple exposures when I want to have sparks coming from multiple directions (as in the photo at the top of this post). I will first take a shot with the grinder on one side of the model and then I will take another shot from the opposite side then combine the two shots in Photoshop.
Conclusion
As I said in the introduction, this is dangerous and I recommend that you DO NOT attempt it. But if you do, share your photos with me, I would love to see them. :)
Fixing the Photoshop Undo Problem
One of the things I find most frustrating things about Photoshop is that it's default behavior for the keyboard shortcut Ctrl-Z (Undo) is unlike every other program on my computer. In Photoshop the keyboard shortcut Ctrl-Z is a toggle between Undo and Redo, for all other programs you can Undo multiple steps. So here is how I modify Photoshop to make Ctrl-Z behave the way it should.
What Should Ctrl-Z Do?
The function that I want Ctrl-Z to perform is called "Step Backward" in Photoshop terms. This command, which is available in the Edit menu, will step backwards in the History Panel, and is basically a multilevel Undo. You can step back as far as the first item in your history panel.
Why Do I Care?
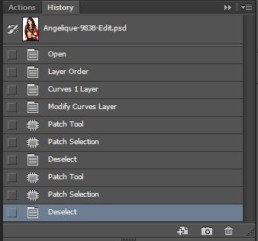
I encounter the need to do multiple Undos most often when I am doing skin retouching. As I described in my video tutorial Glamour Retouching Workflow , I use the patch tool to remove most skin blemishes. It is a two step process, select the blemish and then drag to another location on the skin. If I don't get the result I wanted I often need to step back 2 steps and try again. With the default Ctrl-Z command I can't do this, so I have to resort to the unfamiliar keystroke for Step Backward, or go to the History Panel and step back manually. This really slows down my retouching workflow, so here is the fix.
The Solution
(note: This describes the process for a Windows based system. The keys can be remapped on the Mac but the tools and process are different.)
By remapping the keyboard shortcuts in Photoshop I changed the behavior of the Ctrl-Z key to be Step Backward instead of Undo.
Here are the steps to remap the keys.
(click on images to view larger)
Step 1 - From the Edit Menu Select "Keyboard Shortcuts..."
[one_half_last]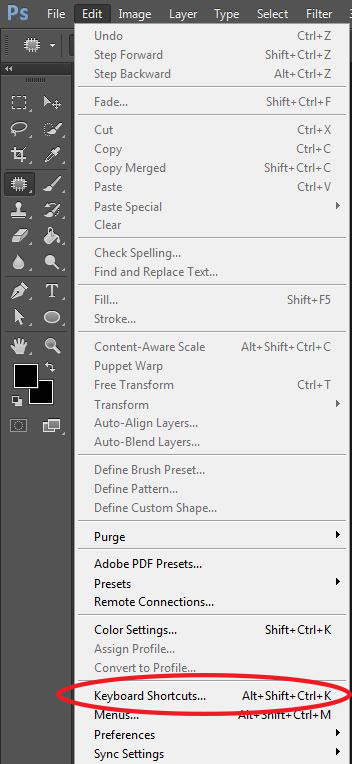
[/one_half_last]
Step 2 - Select "Edit" in the Keyboard Shortcuts Dialog
[one_half_last]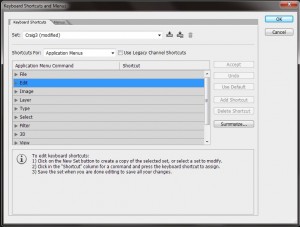
[/one_half_last]
Step 3 - Remap Step Backward Keyboard Shortcut
[one_half]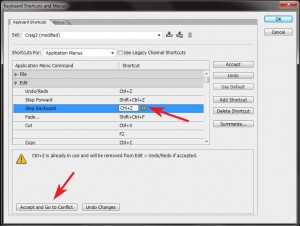
[/one_half]
[one_half_last]
- Select Step Backward and
type "Ctrl-Z' - You will see a warning saying key is already in use. Click "Accept and Go to Conflict" button.
[/one_half_last]
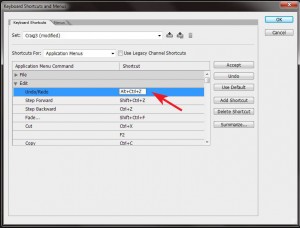
Step 4 - Remap Undo/Redo
Type "Ctrl-Alt-Z" on the Keyboard as the new keystroke for Undo/Redo.
[one_half_last]
[/one_half_last]
Step 5 - Test It
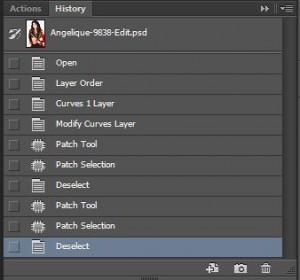
Open the History Panel and try it out. Pressing Ctrl-Z should now move up in the history panel.
[one_half_last]
[/one_half_last]
Conclusion
Remapping the Undo key is one of the first things I do in any new Photoshop install. Give it a try and let me know what you think. Do you any favorite keyboard remappings? I would love to hear about them. Share them in the comments below.
How I Got the Shot - Holey Wall Effect
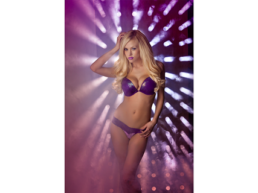
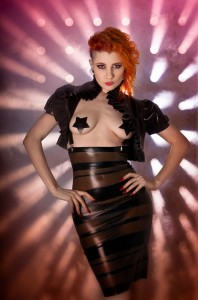
This is first of a series of articles on "How I Got the Shot". In this installment I will describe what I call the Holey Wall effect.
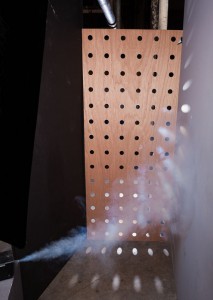
The Holey Wall effect is a relatively simple setup but it can produce some very stunning images. This is a description of how I created this effect. The basic idea is to have streams of light coming from behind your subject. You can control the shape of these streams of light by placing different gobos between the light source and your subject. For this example I constructed a wall with holes in it.
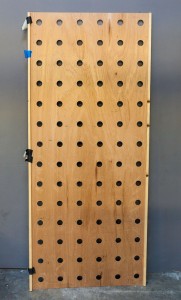
Constructing the Holey Wall
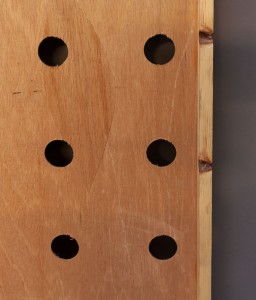
The "wall" is a piece of 3'x8'x1/16" Luan. Luan is often used for door skins and is a very thin plywood. It is so thin that if bends so I added a wooden frame two wood ribs along the back side of the sheet of Luan to give it rigidity. The ribs where created with 3/4"x3/4" Pine and runs vertically on the backside of the sheet of Luan. The holes cut into the Luan are 1-3/4 inch diameter and are spaced 6 inches apart across the entire board to end up with a grid of 6 holes horizontally and 14 holes vertically.
[/one_third]
[one_third]
[/one_third]
[one_third_last] [/one_third_last]
Holey Wall Alternatives
If you don't want to deal with a wood wall, the holey wall can be constructed with any other opaque material. Black foam core board would work great, as would a heavy fabric such as canvas or velvet drapes. If using fabric you want to insure that fabric is opaque and will block all the light coming from behind, except where you cut the holes.
Setup
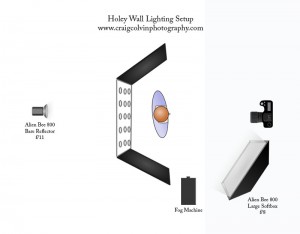
For the best effect you don't want any light coming around the side of the holey wall. There are numerous ways to accomplish this, I often use two 4'x8' form core boards, one on each side, to block the light. Another effective technique is to place the holey wall board in a doorway so the walls around the door block the light. For this example I used a wall on one side and a foam core board on the other.
Lighting
Back Lighting
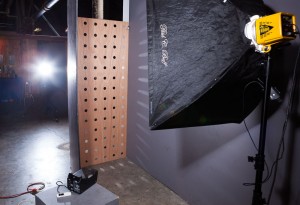
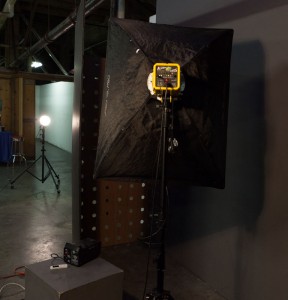
The back light is what creates the beams of light coming through the holey wall. To get the best beams you want to use a hard light source behind the holey wall. I use an Alien Bee 800 with a bare reflector. The further away the light source is from the holey wall the harder the light. I place the light 12 feet away from the back of the holey wall, however if you don't have that much room I have achieved effect with the light only 6 feet away. The power should be set to 1-2 stops over the front light.
Front Lighting
I use a large softbox on the front side of the holey wall to light up my subject. This is providing fill light to the front of the subject and should not be so bright that it overpowers the beams of light. I typically will set the front light to be 1-stop under the back light.
[/one_third]
[one_third]
[/one_third]
[one_third_last]
 [/one_third_last]
Fog
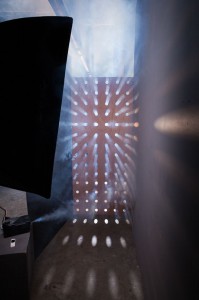
Fog is an important component to achieving this effect, it is what causes the beams of light coming through the holes to be visible. I use a cheap fog machine that I purchased after Halloween from a Halloween store. It is not the greatest fog machine, it will produce fog for approximately 1-2 minutes after which it has to recharge for 2-3 minutes. So the shooting is sporadic, you shoot for a couple of minutes and then have to pause and wait for a couple of minutes. I plan to solve this in future shoots by having a second fog machine that I can alternate between.
I aim the fog behind the subject so it is between the subject and the holey wall. It helps to have an assistant who can direct the fog both high and low so you get complete coverage. You want to avoid having much fog between the subject and the camera. This can be a challenge and I will often have to wait until the fog has dissipated before resuming the shoot.
[/one_third]
[one_third]
[/one_third]
[one_third_last] [/one_third_last]
Post-processing
I do my standard Glamour post-processing (click here to download a video tutorial) techniques on these holey wall images with the exception that I only do selective skin softening. If there is fog between me and the subject I don't soften the skin behind the fog as it is not needed. To get the color effect you see in the image above I used Nik Color Efex Pro.

Conclusion
The Holey Wall technique is a relatively easy technique that can produce dramatic looking photos. Give it a try and post a link to your photos in the comments below, I would love to see them.
The plans for constructing a holey wall and lighting diagram are available for download. Click here to get a copy.
Light Bulb Smoke Photography Tutorial
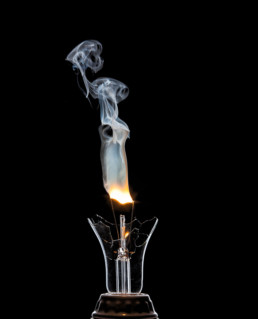
The photo above shows what I call Light Bulb Smoke Photography. It is capturing the smoke rising from the burning filament of a light bulb. This sort of image is very easy to accomplish and in this tutorial I will explain how you can capture similar images.
How it Works
The glass globe of a light bulb has a vacuum inside it which prevents the filament in the light bulb from burning up. By breaking the glass of the light bulb and letting air get to the filament, the filament will burn and give off smoke when power is applied to the bulb. By slowly applying power to the light bulb you can get it to a point where it starts to glow and burn. The burning filament will smoke and creates interesting patterns. As the power is increased the filament will burn faster and will eventually burn up and break the electrical connection.
Capturing Smoke Inside the Globe
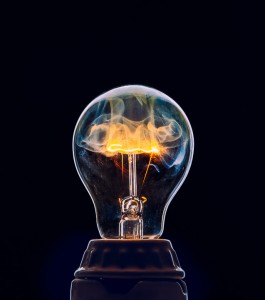
Another techinique is to leave the glass globe intact and break the vacuum by drilling a hole in the base of the light bulb. Because there is no vacuum in the bulb the filament will smoke and burn but smoke will be contained inside the glass globe. This gives another interesting photo opportunity.
Light Bulb Smoke Photography Tutorial - The Video
The following video tutorial shows the setup for photographing Light Bulb Smoke.
[vimeo url="http://vimeo.com/71213783" width="640" height="480" title="0" fs="0" portrait="0"]
Lighting Setup
To light this setup we want just the edges of the light bulb globe to appear lit while the background appears black. This is called Dark Field Illumination. I learned how to do this sort of lighting from this book Light Science and Magic: An Introduction to Photographic Lighting (this is an affiliate link).
In my implementation I placed a large softbox directly behind the light bulb and then taped a black piece of poster board onto the face of the softbox that was slightly smaller than the width of the softbox. The black poster board makes the background appear black. The light on the sides of the poster board highlight just the edge of the light bulb glass.
You will need to adjust the distance of light bulb from the softbox to that just the edges of the light bulb are highlighted. If the light bulb is too close to the softbox then the glass edges will appear black and the glass will not be visible in the image, if the light bulb is too far way then more than just the edges of the glass will be illuminated and you will not be able to see through the glass. So move it back and forth to find the sweet spot.
Electrical Fixture
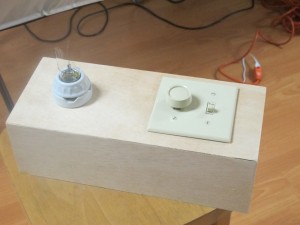
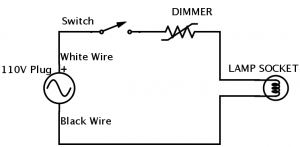
The fixture is relatively simple. It is a wood box that contains a switch, a light dimmer, and a socket for the bulb. There is no need to build a specialized fixture, you could also use a household lamp plugged into a dimmer.
Wiring Diagram
Here is the wiring diagram for the fixture.
The Bulbs
Doing Light Bulb Smoke Photography requires a lot of light bulbs. I look for clear glass globes (not frosted), a simple single filament, and cheap. Here is a link to the ones I used in the above photos Feit Electric 60A/CL/MP-130 60-Watt A19 Household Bulb, Clear, 24 Pack
(this is an affiliate link so if you purchase I make a few pennies. It does not cost you anything additional).
Conclusion
Light Bulb Smoke Photography is relatively easy to do and you can get a lot of interesting shots as the smoke curls away from the filament. Give it a try and share with me any photos you might take. I'd love to see them.

