

Quick Photoshop Tip - Feathering Selections
I used to struggle in Photoshop guessing how much to feather a selection. A lot of it was trial and error, pick some number of pixels to feather, try it, undo, pick another number, rinse, repeat. But this is now a thing of the past, I recently realized I could use the Refine Edge tools to have a visual aid for my feathering of selections.
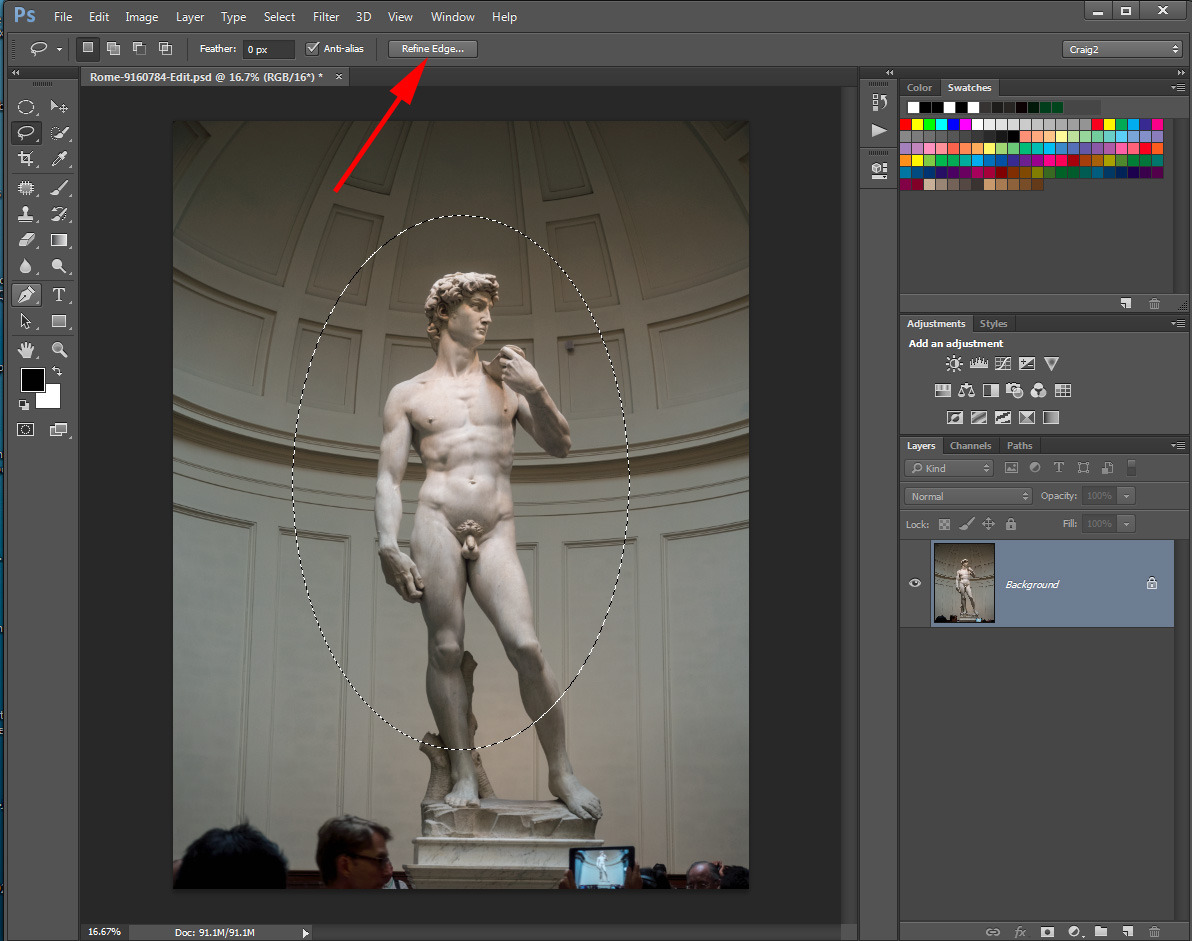
I often want to brighten an area of a photo or create a vignette as one of the final steps of editing a photograph. Here is an example where I want to brighten the statue of David using a mask and a curves layer.
Make Selection
I use the elliptical marquee tool to make my selection then press the Refine Edge button in Photoshop.
Select View Mode
In the Refine Edge dialog box I change the view mode to either View on White. This shows my selection with a white border around it.
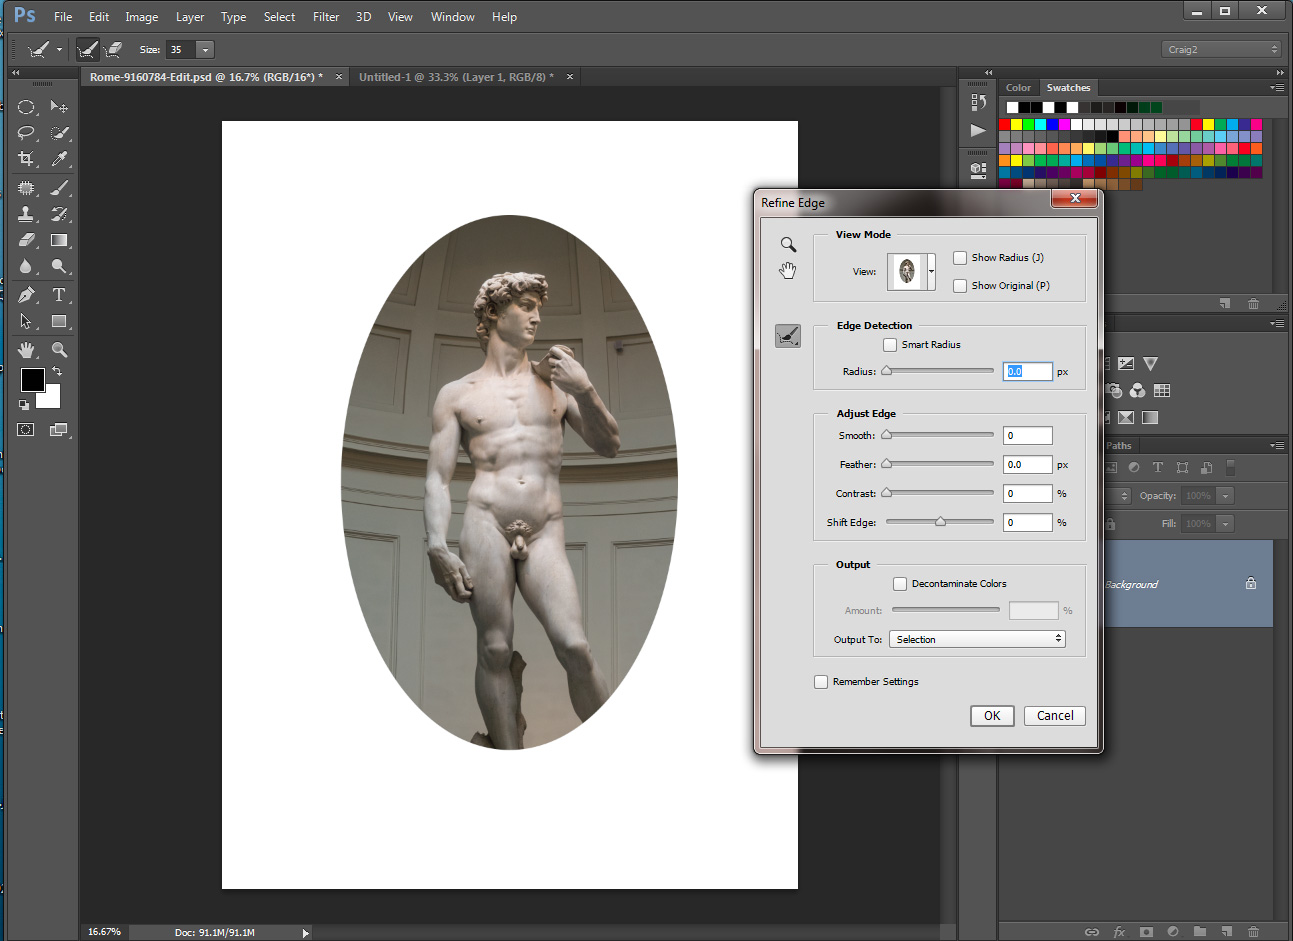
Adjust the Feathering
Using the Feathering slider I visually adjust the feathering to get a selection without a hard edge. I then output to Selection.

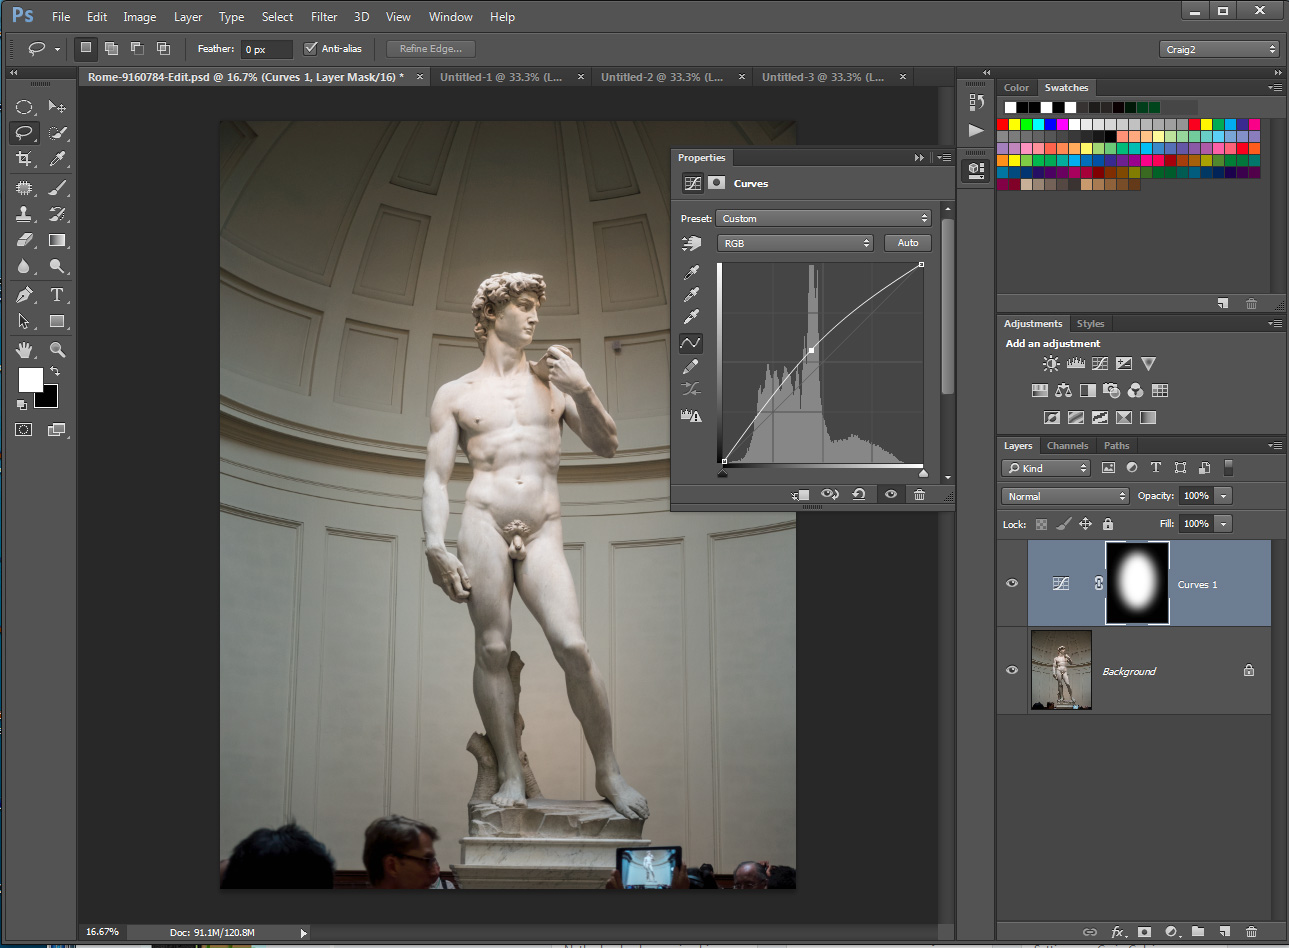
Make my Curves Adjustment
With the feathered selection active I then create a curves layer which will create a feathered mask. I can then adjust the curves layer to brighten or darken the selected area. If I were doing a vignette I would invert the selection prior to creating the curve layer and then darken the edges of the photo using the curves adjustment.
Conclusion
There you have it a quick and easy way to visually determine how much feathering to add to a selection. Let me know if you use this tip and how it works for you.
By the way for those who are going to comment that you are not allowed to take photos of David, they recently changed their policy sometime during the Summer of 2014 and photos are now allowed.
Fixing the Photoshop Undo Problem
One of the things I find most frustrating things about Photoshop is that it's default behavior for the keyboard shortcut Ctrl-Z (Undo) is unlike every other program on my computer. In Photoshop the keyboard shortcut Ctrl-Z is a toggle between Undo and Redo, for all other programs you can Undo multiple steps. So here is how I modify Photoshop to make Ctrl-Z behave the way it should.
What Should Ctrl-Z Do?
The function that I want Ctrl-Z to perform is called "Step Backward" in Photoshop terms. This command, which is available in the Edit menu, will step backwards in the History Panel, and is basically a multilevel Undo. You can step back as far as the first item in your history panel.
Why Do I Care?
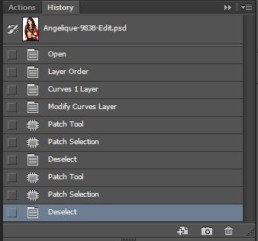
I encounter the need to do multiple Undos most often when I am doing skin retouching. As I described in my video tutorial Glamour Retouching Workflow , I use the patch tool to remove most skin blemishes. It is a two step process, select the blemish and then drag to another location on the skin. If I don't get the result I wanted I often need to step back 2 steps and try again. With the default Ctrl-Z command I can't do this, so I have to resort to the unfamiliar keystroke for Step Backward, or go to the History Panel and step back manually. This really slows down my retouching workflow, so here is the fix.
The Solution
(note: This describes the process for a Windows based system. The keys can be remapped on the Mac but the tools and process are different.)
By remapping the keyboard shortcuts in Photoshop I changed the behavior of the Ctrl-Z key to be Step Backward instead of Undo.
Here are the steps to remap the keys.
(click on images to view larger)
Step 1 - From the Edit Menu Select "Keyboard Shortcuts..."
[one_half_last]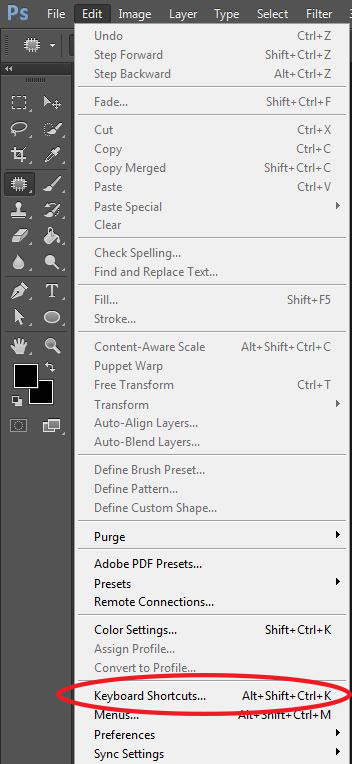
[/one_half_last]
Step 2 - Select "Edit" in the Keyboard Shortcuts Dialog
[one_half_last]
[/one_half_last]
Step 3 - Remap Step Backward Keyboard Shortcut
[one_half]
[/one_half]
[one_half_last]
- Select Step Backward and
type "Ctrl-Z' - You will see a warning saying key is already in use. Click "Accept and Go to Conflict" button.
[/one_half_last]
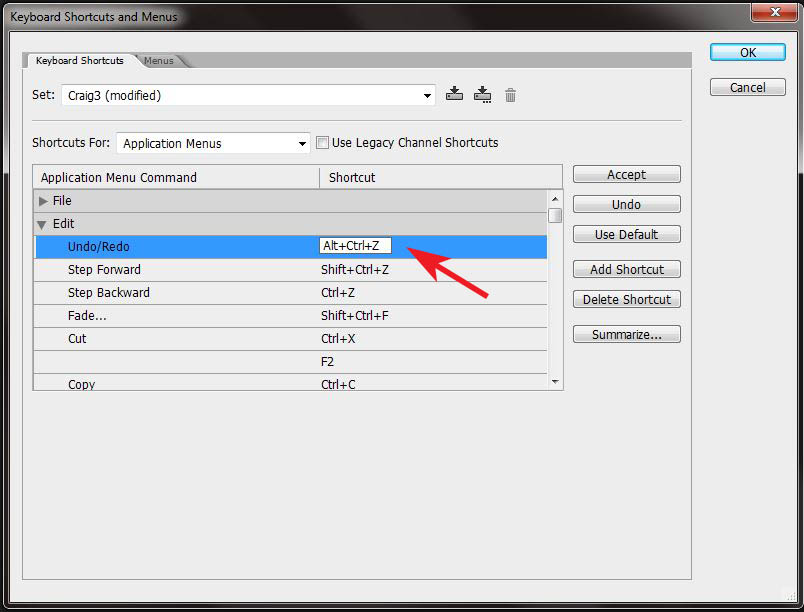
Step 4 - Remap Undo/Redo
Type "Ctrl-Alt-Z" on the Keyboard as the new keystroke for Undo/Redo.
[one_half_last]
[/one_half_last]
Step 5 - Test It
Open the History Panel and try it out. Pressing Ctrl-Z should now move up in the history panel.
[one_half_last]

[/one_half_last]
Conclusion
Remapping the Undo key is one of the first things I do in any new Photoshop install. Give it a try and let me know what you think. Do you any favorite keyboard remappings? I would love to hear about them. Share them in the comments below.

Turning a Crappy Photo Into a Keeper

They Were All Rejects
Trying To Salvage the Shot

The Sky Sucked

The 10 Minute Photoshop Job
- Add clouds. Used Quick Selection Tool to select blue sky, added my cloud image as a layer and made a mask from the selection. A couple of minutes of cleanup on the mask around the wave and rocks.
- Change color of the rocks. Sample reddish color from the clouds, add a solid color layer with the blend mode set to "Color", then with a soft brush set to 10% opacity I paint in the color onto the rocks in the background
- Change cloud color to be more red and increase saturation
- Use Color Effect Pro 4 filter, Tonal Contrast, Skylight filter, and Darken/Lighten Center.
- Back in Lightroom I cropped the image and I was done.

Final Result

How About Your Images?
Improving Content Aware Fill
Photoshop CS5 added the feature Content Aware Fill which is an amazing tool which I use quite often. However with certain images it often has difficulties and I end up having to do a lot of manual cleanup after using Content Aware Fill.
I recently came across this video by Dave Cross where he shows a great technique for improving Content Aware Fill. I've tried it a few times now and have been impressed with how easy it is and how it addresses the problems I had been having. Give it a try.
Make Content Aware Fill even Better from Dave Cross on Vimeo.

Open Letter to Adobe from Scott Kelby
Scott Kelby has written this very good open letter to Adobe about their recently announced pricing strategy for the next release of Photoshop and the Creative Suite.
Of course Scott has ulterior motives, in that if his 70K NAPP members don't upgrade to the new version they are less likely to have need of Scott's and NAPP's services. But even so it is well argued and to the point.
My guess is that Adobe wants everybody to convert to the subscription model, as long term that is a better business decision. It also means they don't have to keep coming up with huge revoltionary features but can instead rely on incremental evolutionary features.
It will be interesting to see how this all pans out.
60 Most Wanted Photoshop Tutorials, Brushes, Textures
Stumbled across this blog post today and it has some great information.
http://www.noupe.com/photoshop/60-most-wanted-photoshop-tutorials-brushes-psds-and-resources.html
Just browsing though it, there are way more than 60 tutorials. In fact what this is, is a list of 60 lists of tutorials. So this list represents 1000s of tutorials.
A lot of the tutorials cover the same topics (I counted 12 talking about HDR), but there are some real gems in there. I especially liked some of the tutorials in 50 Excellent Digital Photography Photoshop Tutorials
Letting Photoshop Do the File Size Calculation
I participate in a weekly photo challenge on the site DPChallenge. Besides taking the photo, one of the challenges I often face is getting photo to be the right file size for submission (either 150K or 200K depending upon the compeition). Photoshop has a quality slider when using Save for Web, and a readout of the file size on the status bar that updates as I move the slider, but I've found it to not be entirely accurate. It can be a few K off, so even though it says my file will be 149K it might come out at 152K instead. I often have to save the file several times to get the file size correct.
Today I came across this great tip on Planet Photoshop blog. It turns out that the option called Optimize to File Size which solves this problem for me.
I'm a happy man
Photoshop Seminar was Great
Just got back from the Scott Kelby training seminar Photoshop CS3 for Photographers Tour in San Francisco. My head is about to explode from the amount of information I absorbed.
It was a great seminar and if you ever get the chance to go to one I would highly recommend it. Basically it covered Curves, Hue/Saturation/Lightness, and Advanced Masking/Selection techniques. There was more information presented that I did not know than information I did know so it was well worth the $79.
I got there about 20 minutes before it started and there was a short check-in line and I decided to go to the restroom first. In the 2 minutes it took me to go to the restroom a hundred people got in line and it was out the door. By the time I got in it was starting and and I didn't get the best seat, was way off to the side. Next time I will be sure to get there early. I was surprised by how popular it was, I counted over 600 people in attendance.
I am now off to try out some of my new found skills.
Photoshop CS3 for Photographers Tour
I just signed up for the Scott Kelby Training seminar "Photoshop CS3 for Photographers Tour" by Ben Willmore being held in San Francisco next week. I've been meaning to take some Photoshop classes for some time now because post-processing is definitely an area I need to improve in my photography. Anyway I'm looking forward to it and will post a review when I'm done.